
The Chubasco Sweater
An intermediate-friendly knitted sweater– my Chubasco Sweater– is a free pattern here on the blog! Read through my inspiration, materials and stitch pattern used. Or scroll on down for the free pattern.
Introduction + Design
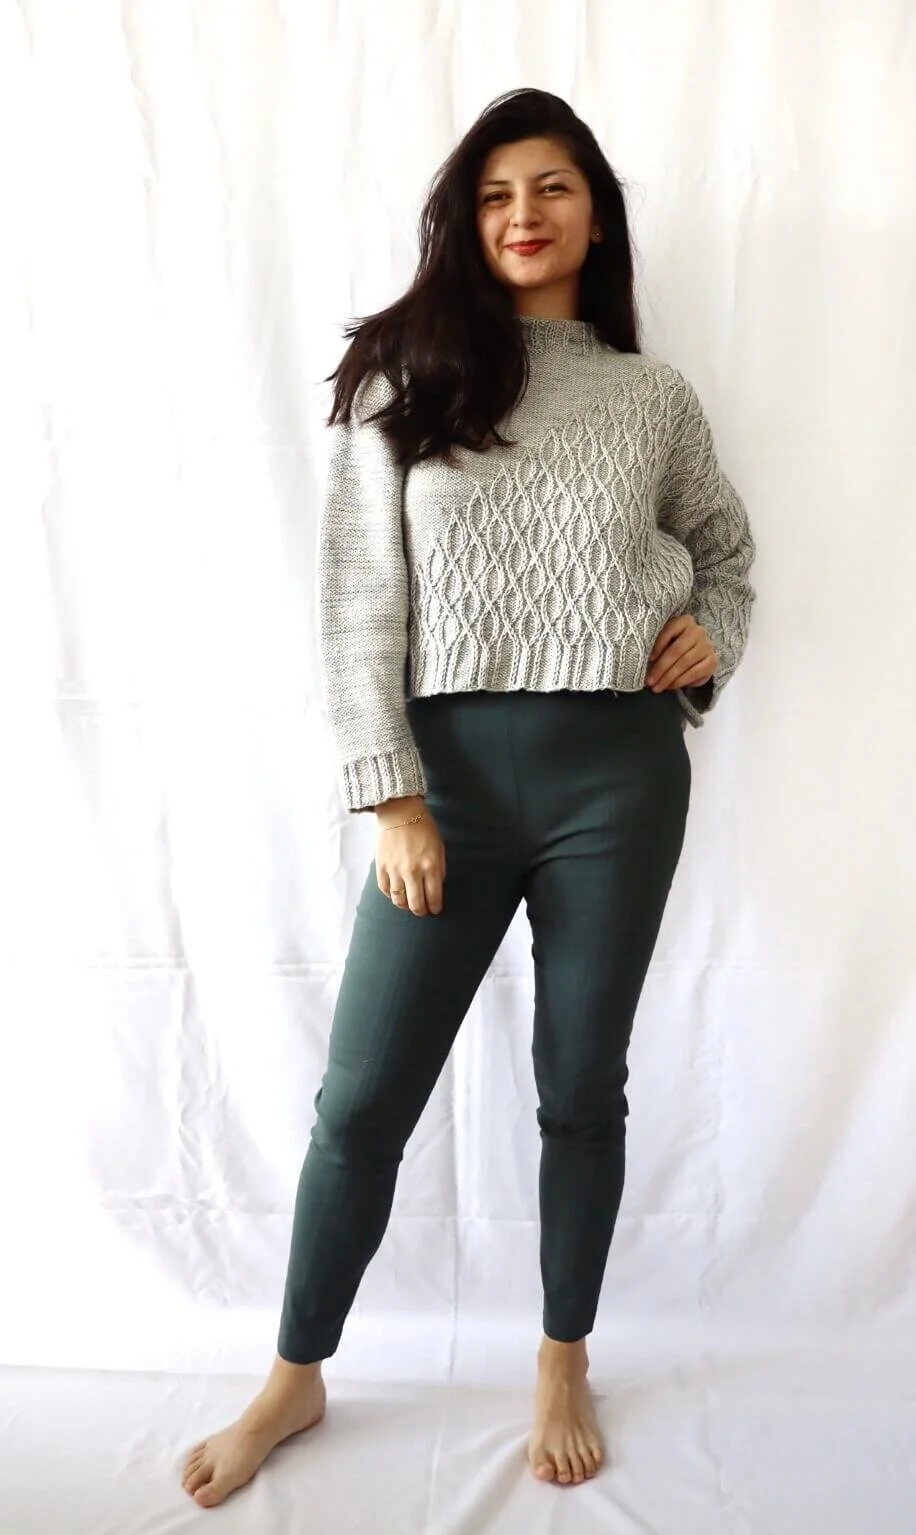
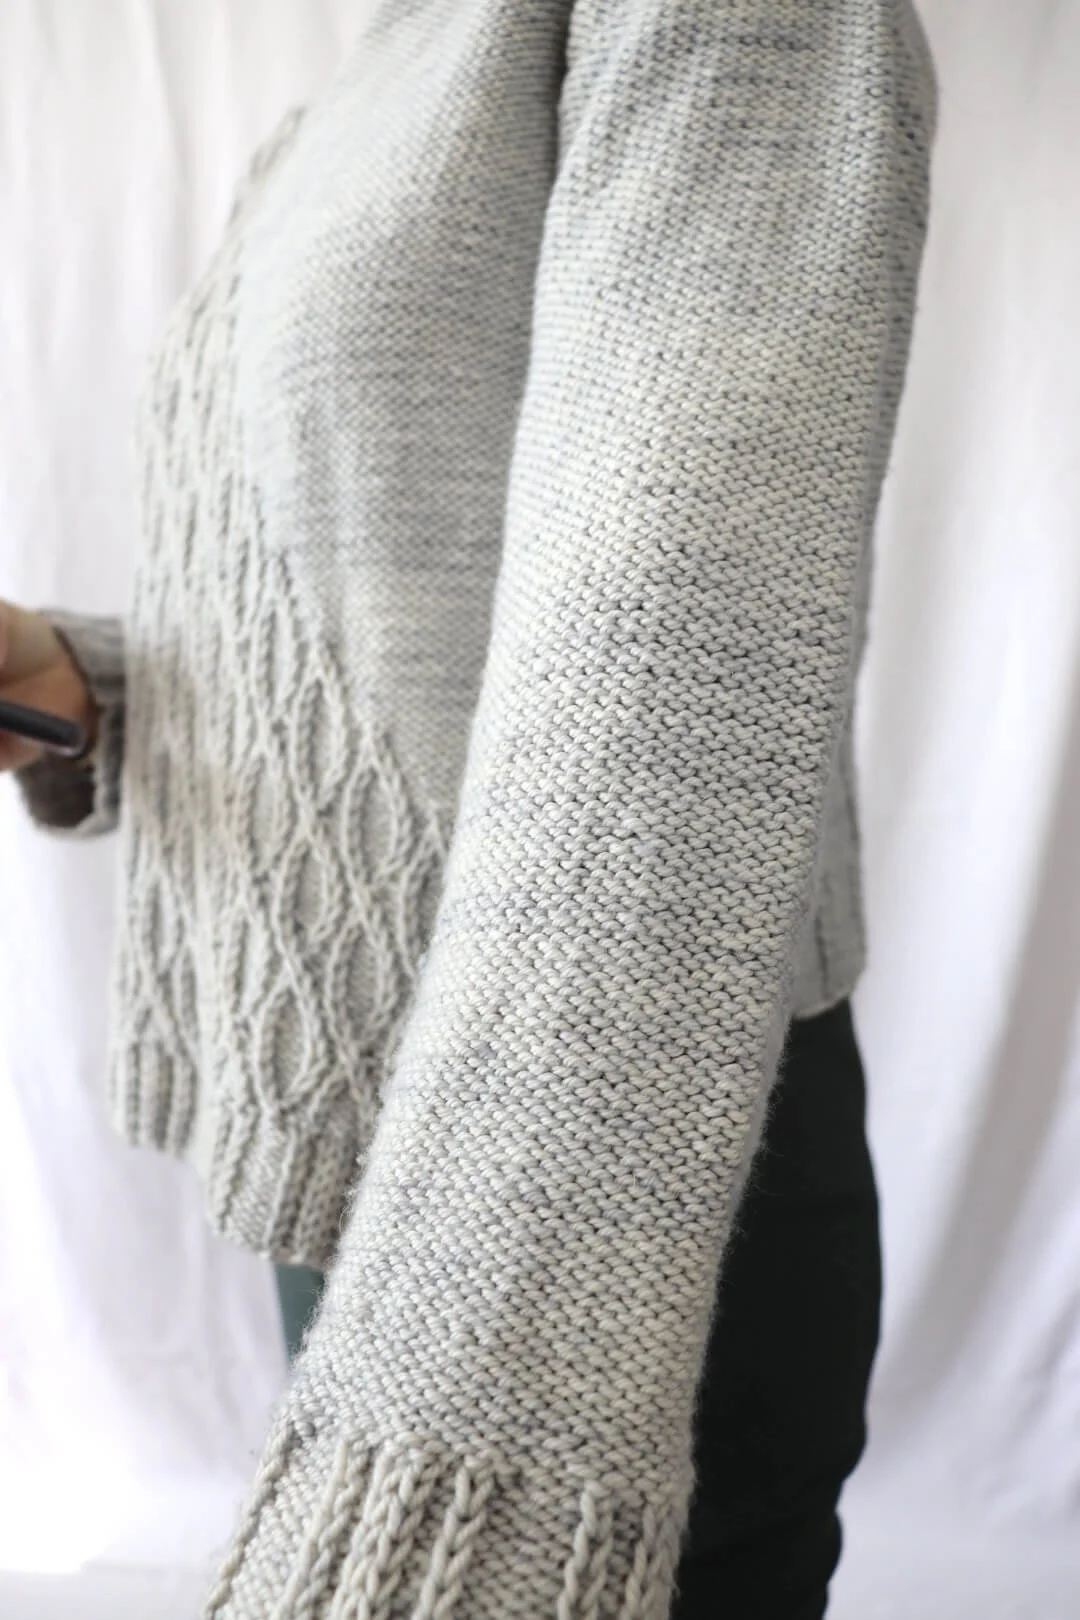
The Chubasco Sweater is inspired by unusual symmetry, in this case by the unexpectedness of the weather, how the sky is clear one moment, and the next, the skies are falling and everything is chaos. By combining the intricate Crossed Loops stitch and the mindlessness of the Reverse Stockinette stitch, the Chubasco sweater is and unexpected delight to knit, just like that unexpected rain on a clear Spring day.
The Chubasco sweater features a hi low, standard-fitting, drop shoulder silhouette, with straight sleeves and a mock turtle neck. It’s worked flat in 4 pieces (front, back and sleeves) bottom-up, and is then seamed together. After the back and front are joined, stitches are picked to create the turtle neck.
This pattern includes instructions for waist, hip and tunic lengths for both the front and back pieces, so you can combine them as you prefer. There are six options to combine the different lengths:
- Option 1: cropped front and hip length back.
- Option 2: cropped front and back. - Option 3: hip-length front and back.
- Option 4: tunic-length front and back.
- Option 5: cropped front and tunic-length back.
- Option 6: hip-length front and tunic-length back.
Keep the number of the option you prefer, as well as the chosen size, in mind when checking out the yardage needed on the Materials section of the pattern.

The choice is yours!
As mentioned before, you have at least 6 options on how to knit this sweater. That’s without counting sleeve options, and how you want to play with the necklines of the front and the back! so have lots of fun picking your adventure.
The challenge you were looking for.
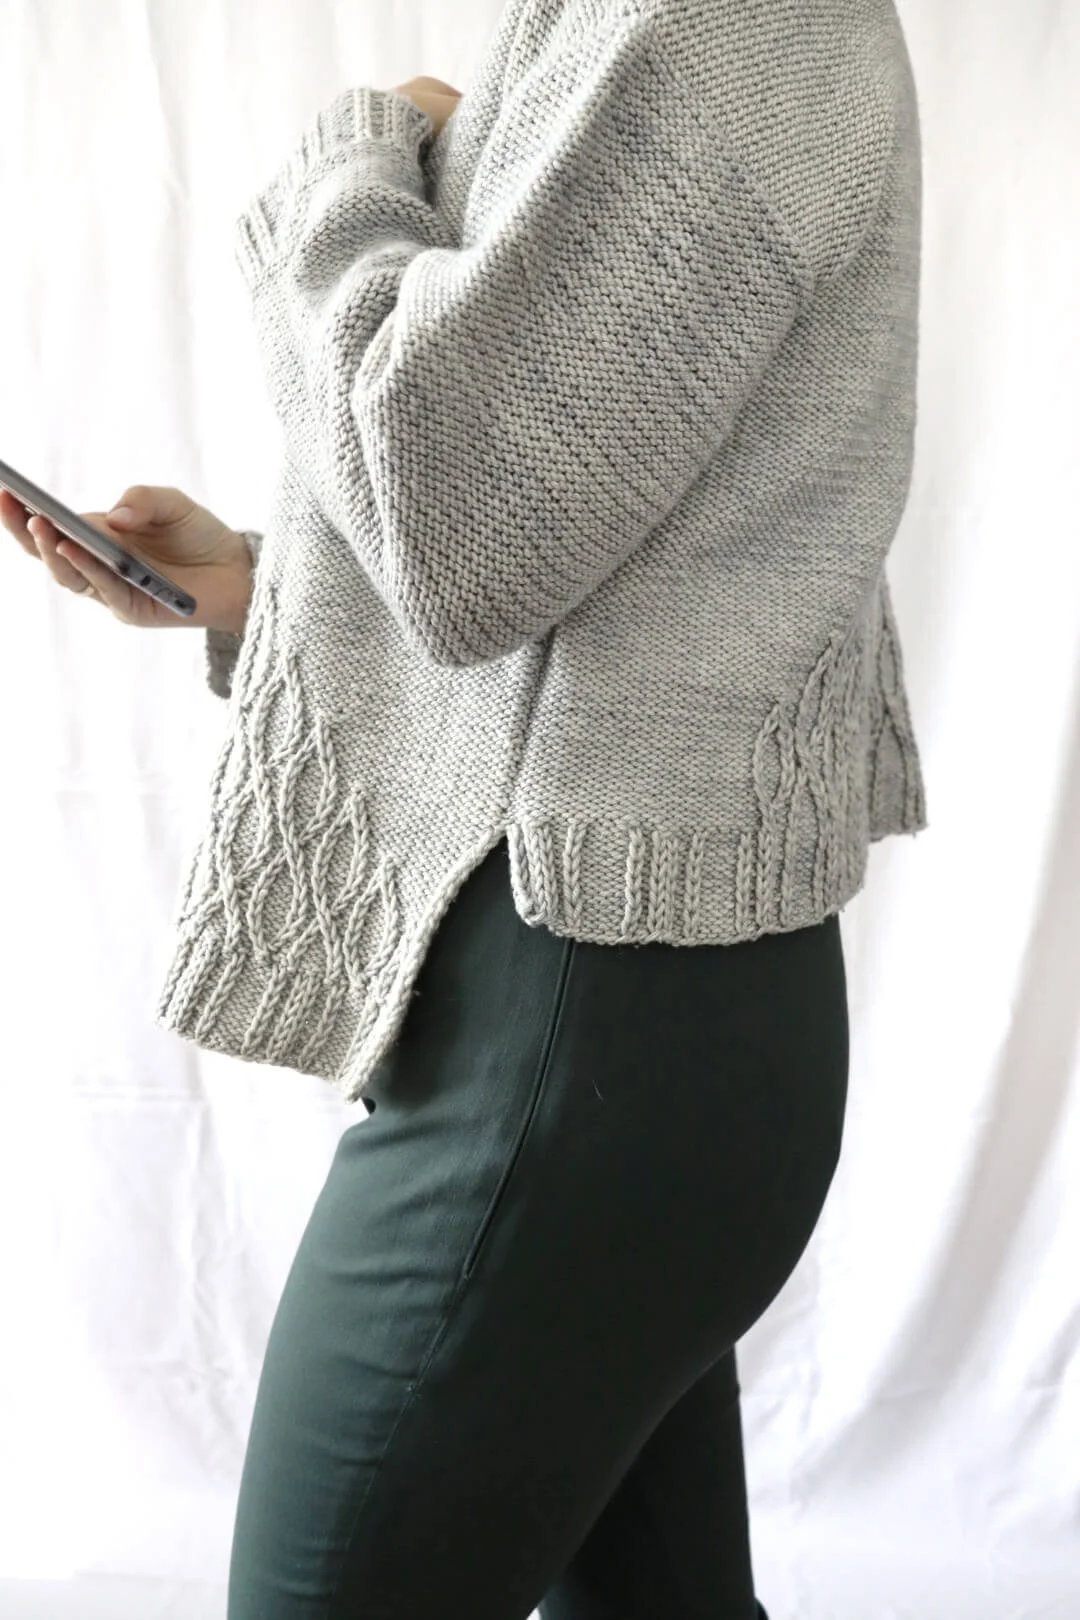
I’m not gonna lie, the stitch pattern used for this pattern is not particularly easy. You’ll definitely have to pay attention to your stitches, specially on the Right Side rows, where most of the action happens, as well as the decreases of the stitch to creater the slants on the Front and Back. HOWEVER. The stitch pattern is so beautiful and detailed! It’s completely worth the effort. Plus, once you have a few row repeats under your belt you probably won’t need to check the pattern!


Free Pattern
The pattern is available for free in this blog post. This blog has ads so I can provide the pattern for free.
Ad-free PDF version
Get the ad-free, large print, printable PDF pattern, which includes a stitch and row count table HERE on Ravelry, or HERE on Etsy.
Buying the PDF version makes it easy to follow the pattern without ads and is ideal if you want to print the pattern. As a bonus, when you buy the pattern it supports my work and enables me to continue making patterns for you!
PIN this pattern to your Pinterest boards for later HERE.
Techniques Required
Knit & purl, slip stitches, crossing stitches, cast-on and bind-off • Decreasing stitches
• Specialty bind-off: sloped bind-off for back and front neck • Working from written instructions
• Picking up stitches
• Blocking
• Seaming: Mattress stitch, Horizontal seams (join shoulders), Vertical to Horizontal seams (join sleeves).
Yarn
I chose to knit this sweater with Julie Aselin’s Leizu Worsted. It’s hand-dyed, and the quality was just what I was looking for. Incredible soft to the touch, which made it a pleasure to knit, and the color is bright and so accurate to the one deppicted on their website. You can check where to get Julie Asselin’s yarn HERE.
For this sweater you will need:
Julie Asselin Leizu Worsted worsted weight yarn (4 oz/115 g; 200 yd/185 m; 90% superwash merino/10% silk). Color Echo.
Or
Worsted weight yarn; 90% superwash merino/10% silk.
You can find some great options for this kind of yarn HERE on LoveCrafts (they ship worldwide).
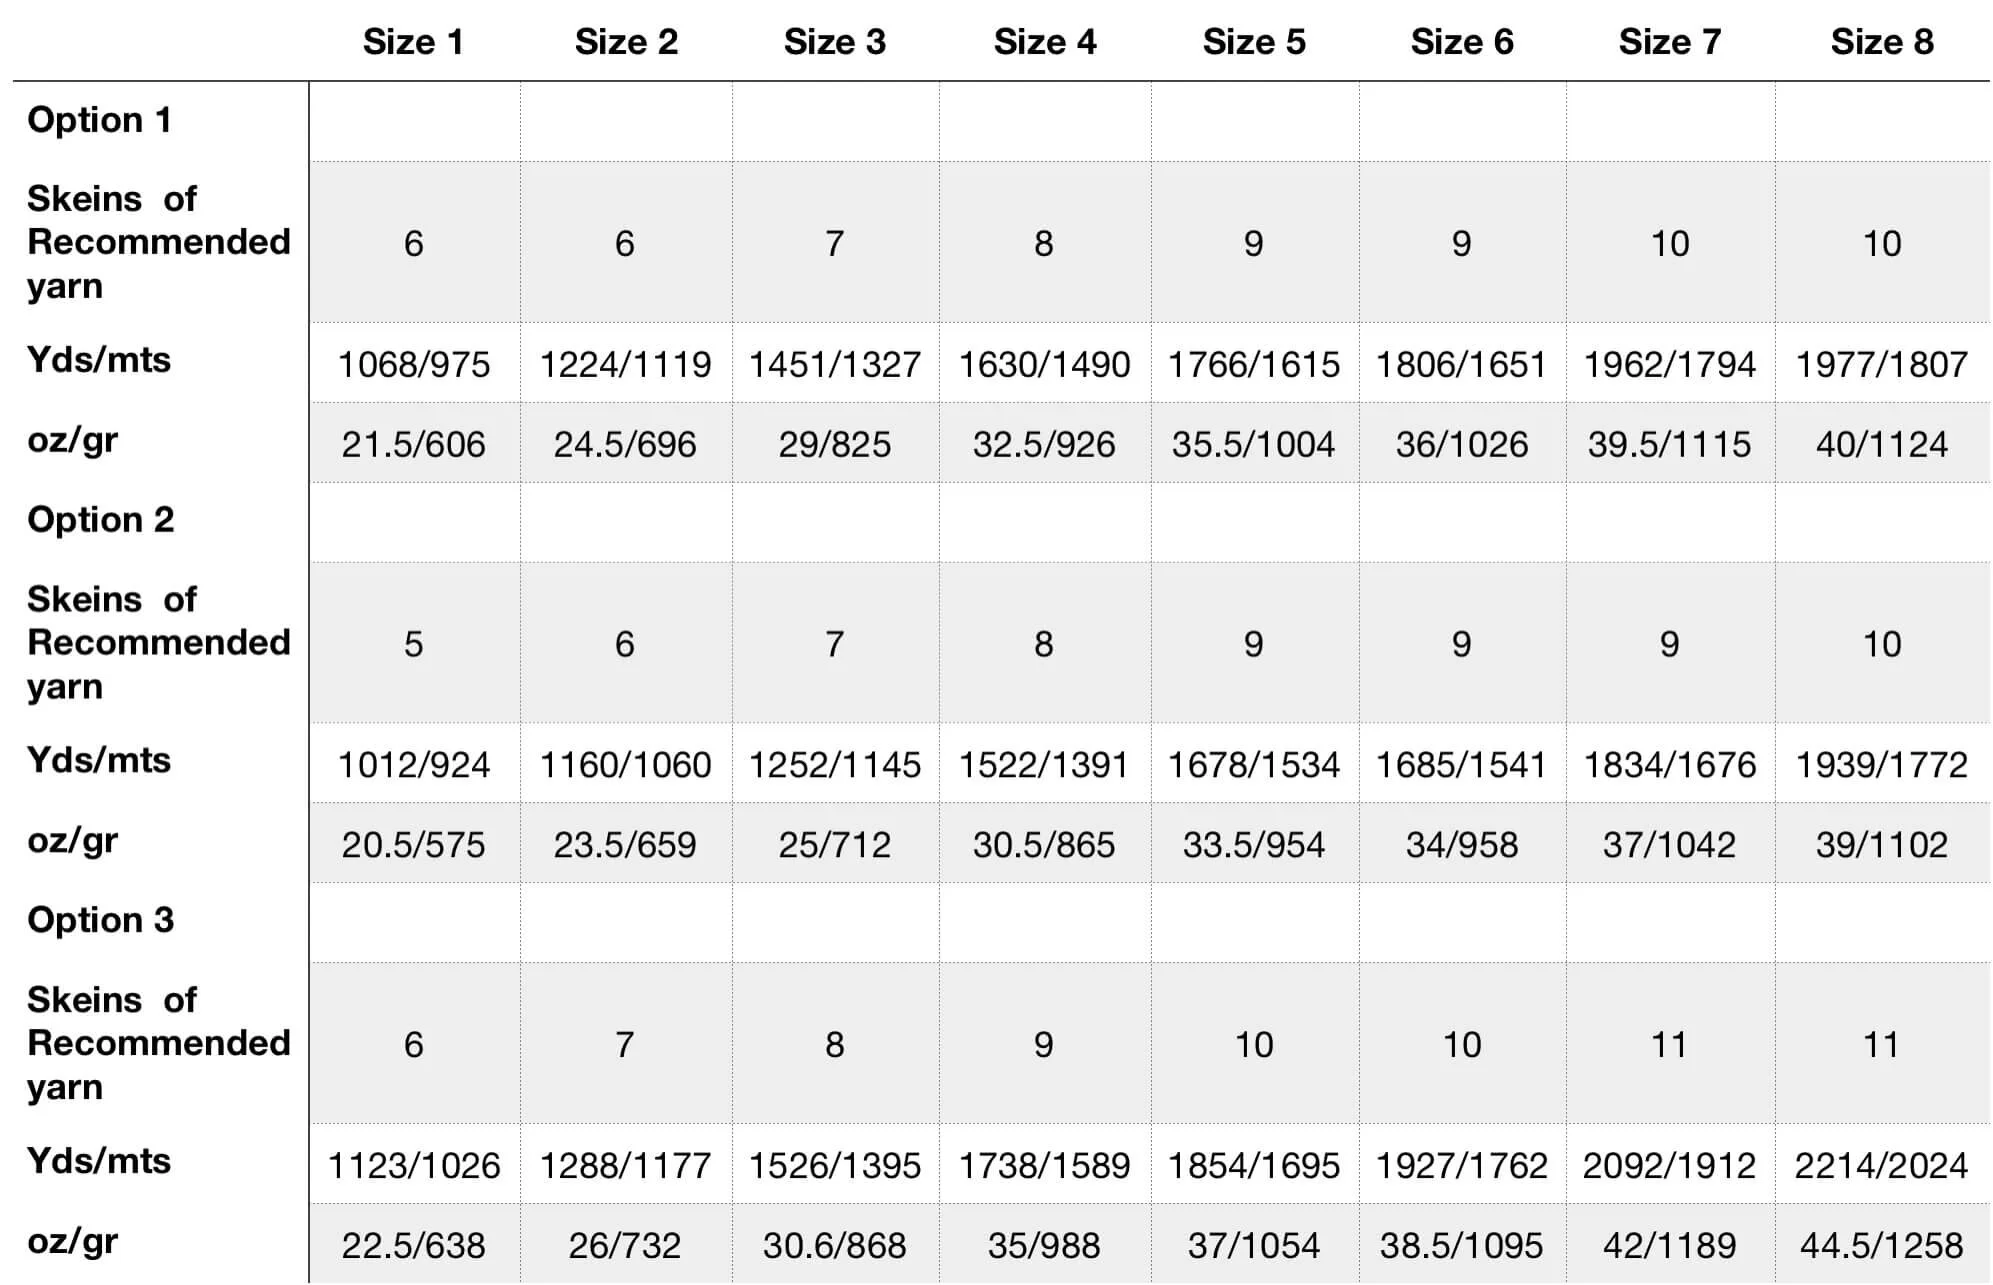
Yardage
Note: Sizes 1, 2, 3, 4 and 5 include a 10% more of safety length/weight. Sizes 6, 7 and 8 include a 5% more of safety length/weight.

Materials
Needles
US size 6/4 mm needles or size to obtain correct gauge.
Notions
● Tapestry needle.
● 2 Stitch markers or scrap yarn.
Gauge
20 sts and 28 rows = 4”/10 cm in Reverse Stockinette stitch with US size 6/4 mm needles after blocking .
26 sts and 31 rows = 4”/10 cm in Crossed Loops stitch with US size 6/4 mm needles after blocking.
Note: Gauge is very important for this pattern. The row instructions are given in numbered rows, so both the stitch and row gauge of the Crossed Loops st are very important to match. When blocking the swatch, be sure to give it a good stretch both width and length-wise and then pin in to measurements. Make a swatch of at least 8”/20 cm width/length for more accuracy.
Sizes
1(2, 3, 4, 5)(6, 7, 8, 9)
To fit with + 0-2” / 0-5 cm of ease at the bust.
Note: Sample was knit in Size 3, to fit the model with a 40” / 98 cm bust.
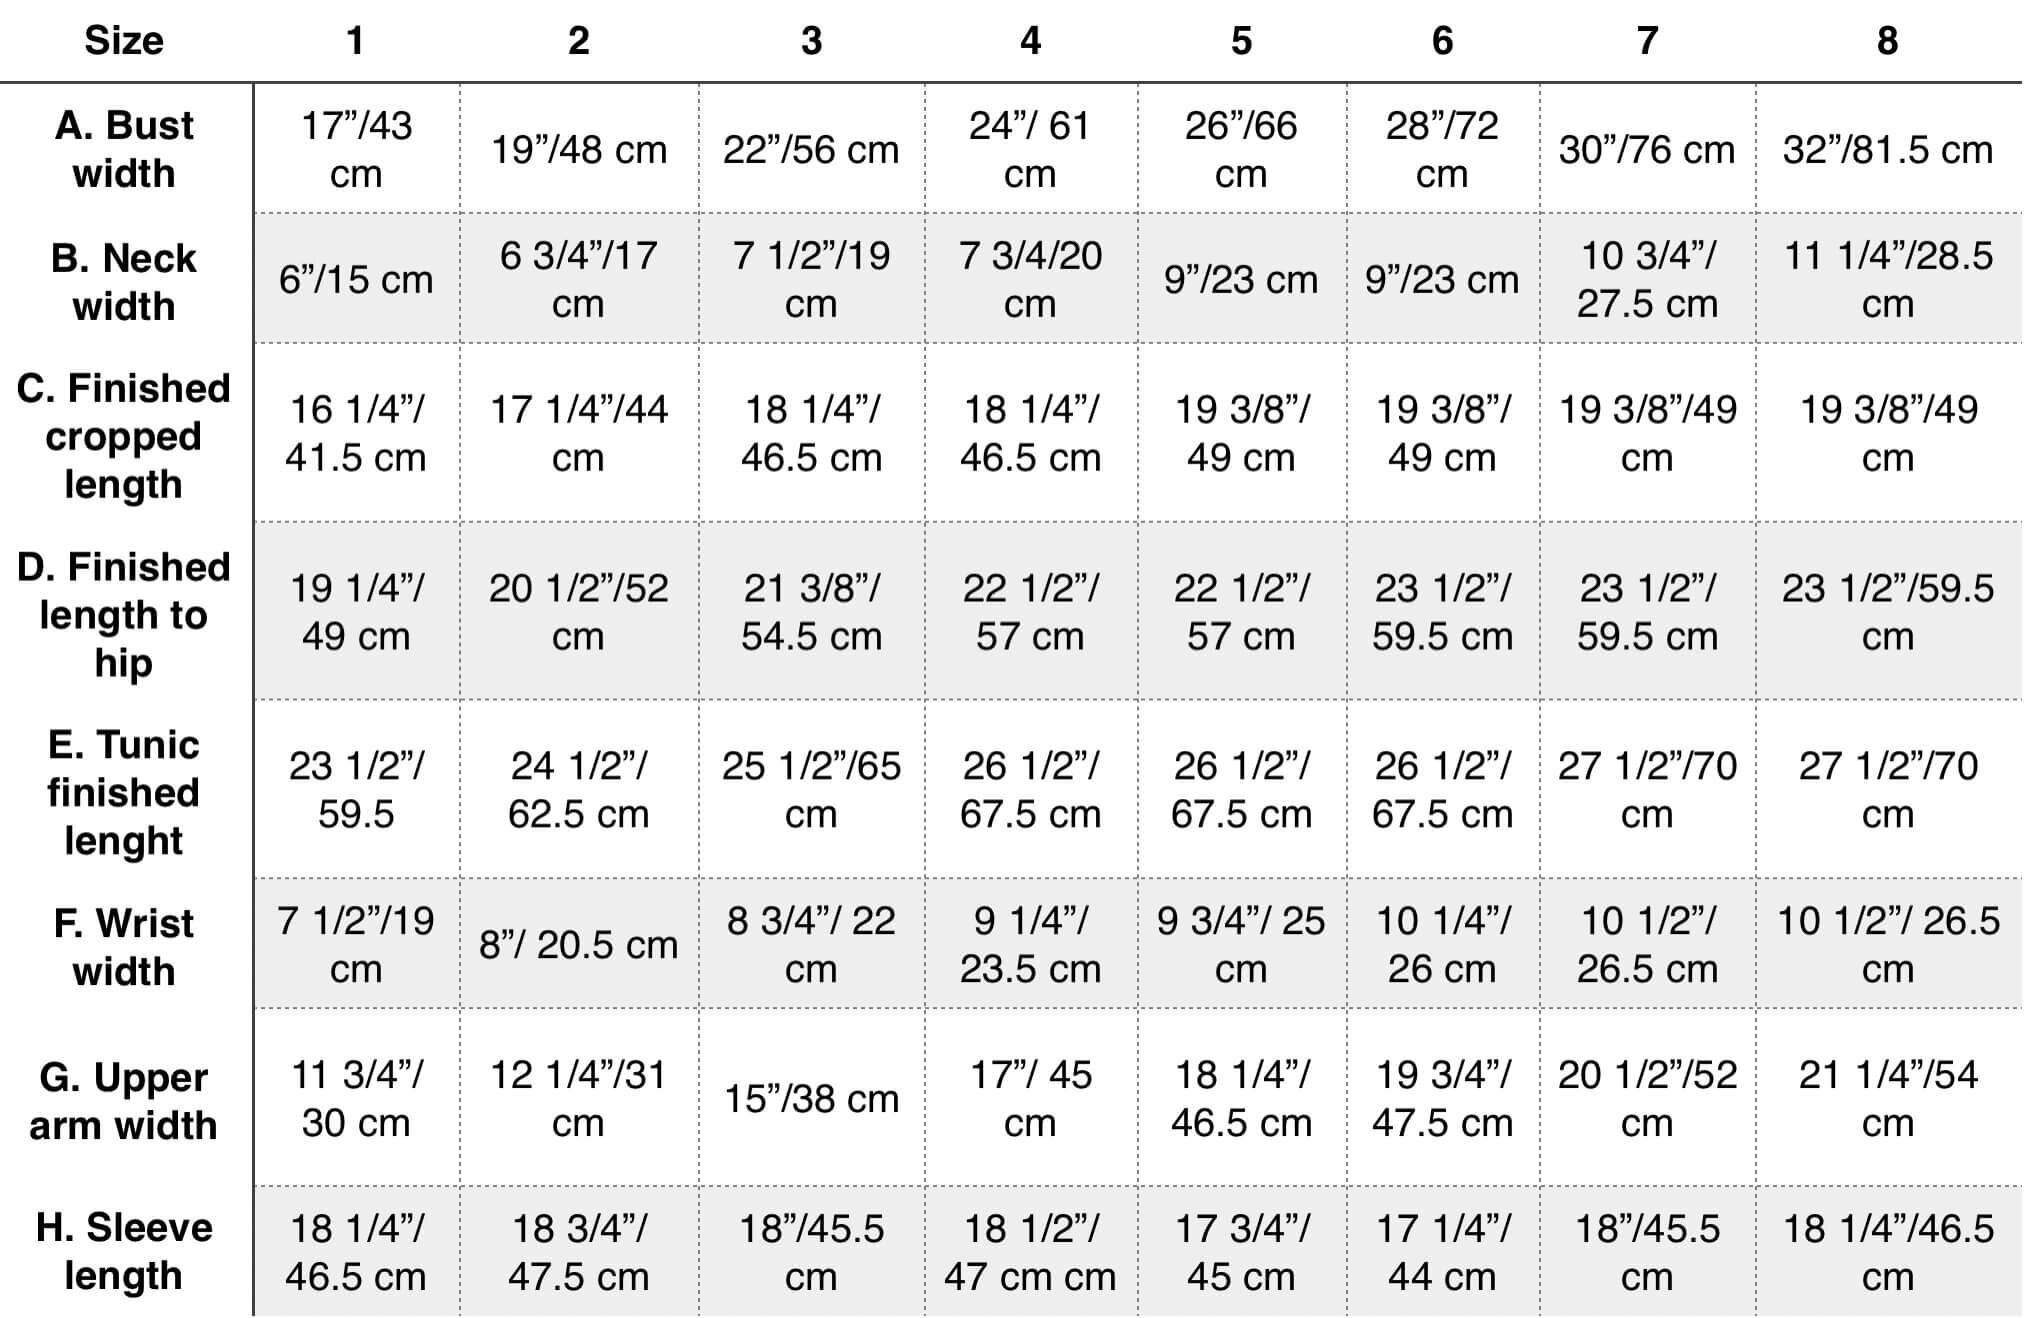
Finished Measurements
Bust at underarm: 34 (38, 44, 48, 52) (56, 60, 64)”/86.5 (95.5, 111.5, 122, 132) (142, 152.5, 162.5) cm
Finished Cropped Length: 16 ¼ (17 ¼, 18 ¼, 18 ¼, 19 ⅜) (19 ⅜, 19 ⅜, 19 ⅜)”/41.5 (44, 46.5, 46.5, 49)(49, 49, 49) cm
Finished Length to Hip: 19 ¼ (20 ½, 21 ⅜, 22 ½, 22 ½) (23 ½, 23 ½, 23 ½)”/49 (52, 54.5, 57, 57) (59.5, 59.5, 59.5) cm
Tunic Finished Length : 23 ½ (24 ½, 25 ½, 26 ½, 26 ½)(26 ½, 27 ½, 27 ½)”/ 59.5 (62.5, 65, 67.5, 67.5)(67.5, 70, 70) cm
Ease intended: 2 to 4”/5 to 10 cm
Note: The finished length
measurements are taken while laying. If you use the same yarn or one with similar composition, the garment may lengthen 1 or 2”/2.5 or 5 cm.
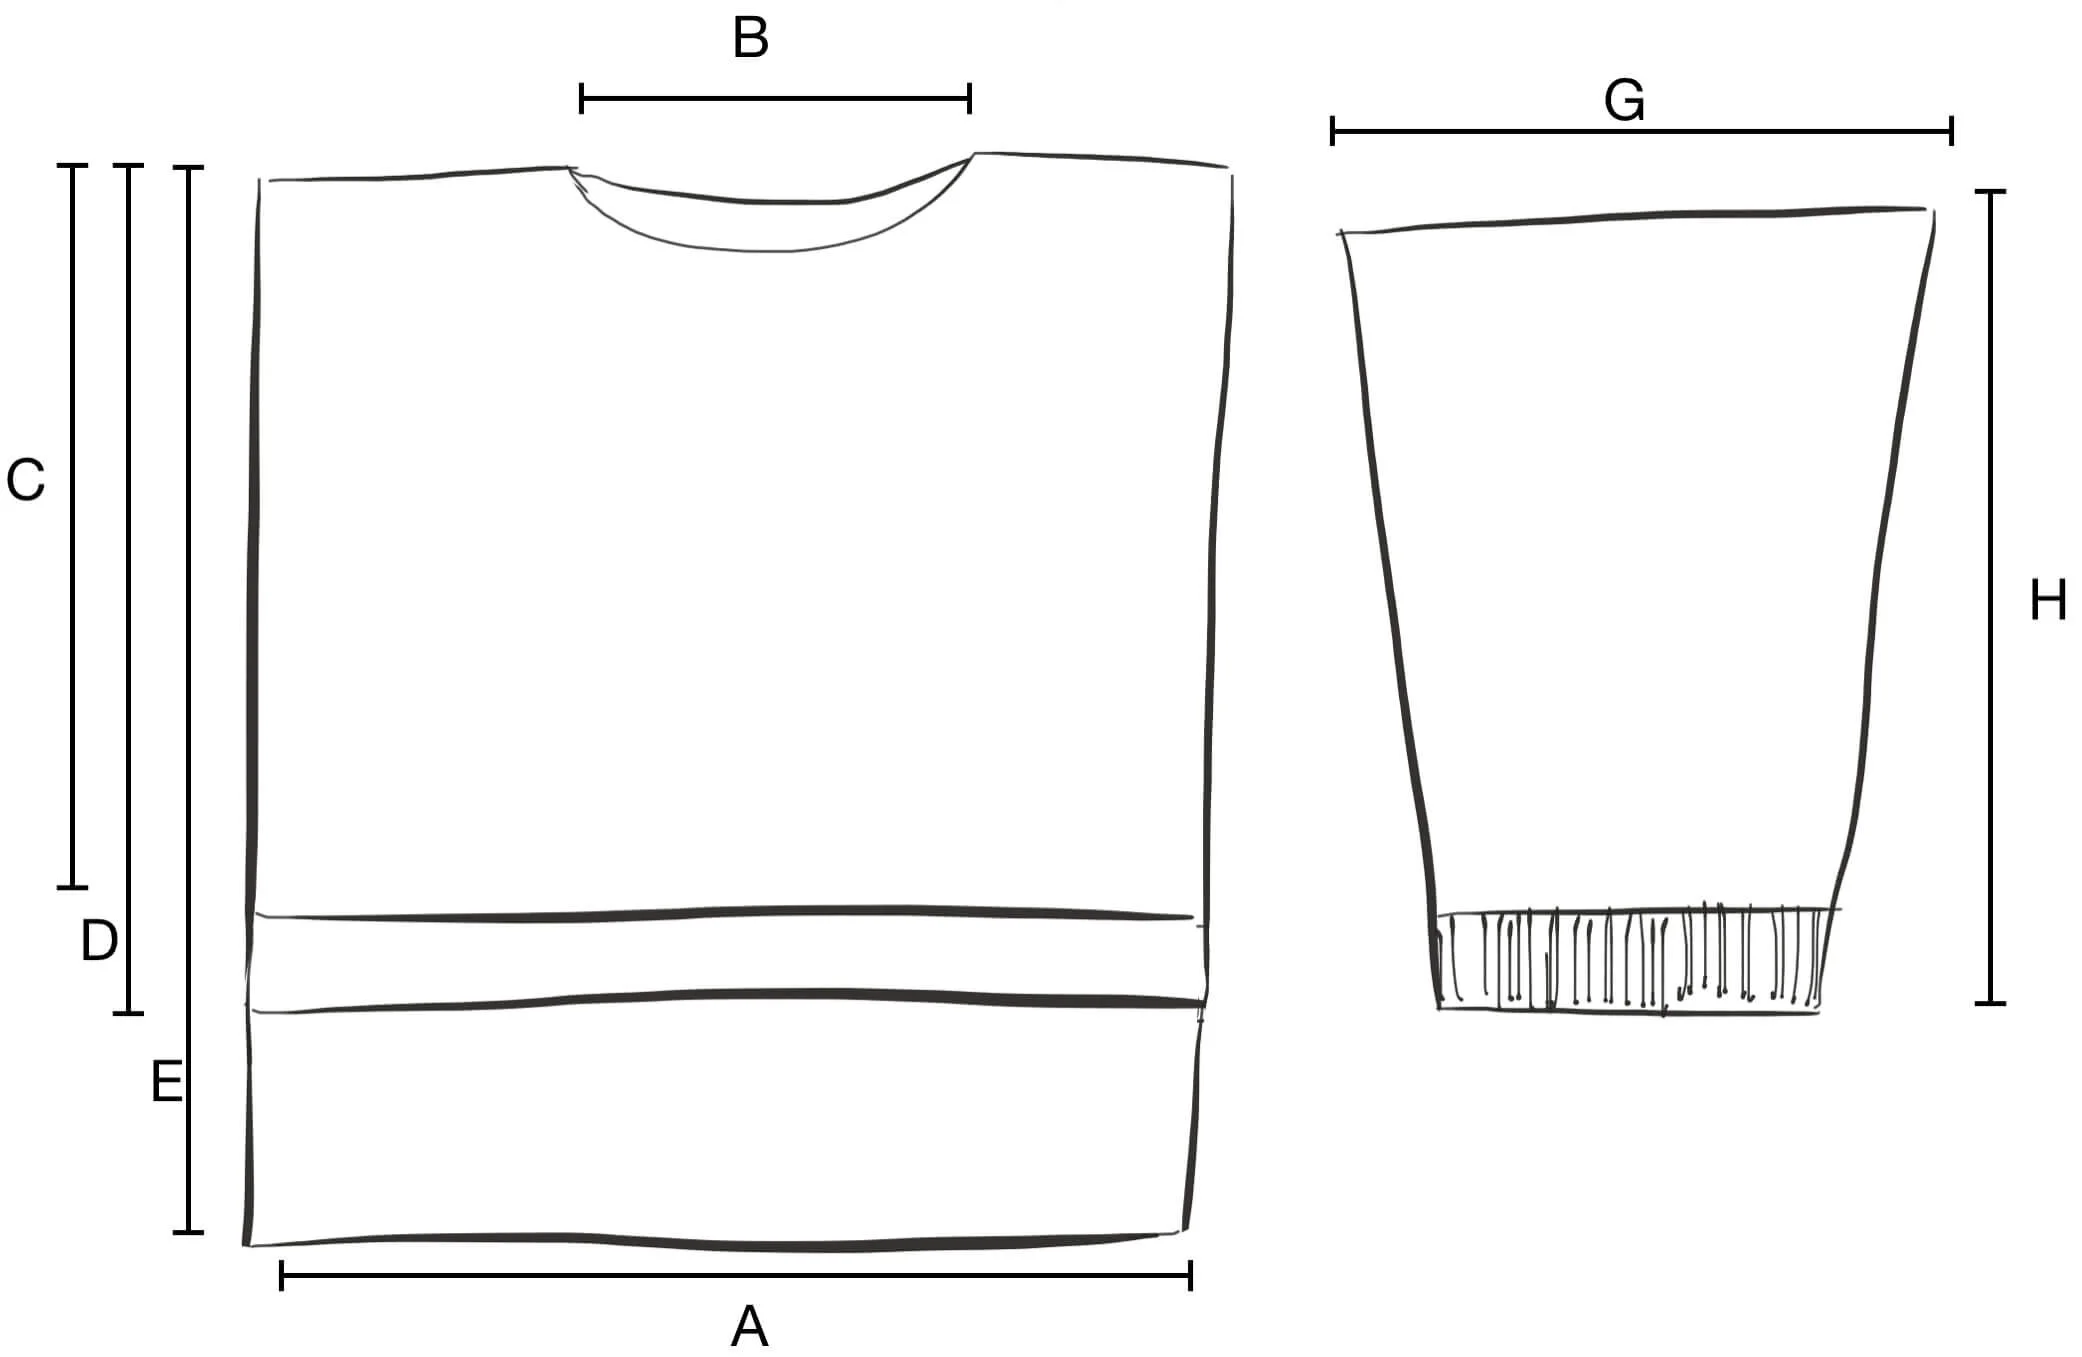
Schematics
Abreviations
BC: back cross.
BO: bind-off.
CO: cast-on.
FC: front cross.
k: knit st.
k2tog: k2tog.
kwise: knitwise, as if to k the st. LN: left-hand needle
M1L: make 1 left.
M1R: make 1 right.
p: purl st.
pc: place marker.
pwise: purlwise.
Rep: repeat
Rev St st: Reverse Stockinette stitch RN: right-hand needle
RS: Right Side
sl: slip st.
skp: slip, knit, pass over.
sm: slip marker
st: stitch.
WS: Wrong Side
wyib: with yarn in back
wyif: with yarn in front
Techniques
Back cross: skip the first st. K the second st and leave in on the needle, then purl the skipped stitch. Slip both sts from the needle together.
Front cross: skip the first st. P the second st through the back loop and leave it on the needle, then k the skipped st. Slip both sts from the needle together.
Horizontal seams (join shoulders).
Knit.
Knit 2 together: insert the needle through the front loops of the first 2 sts on the LN needle and k them together as if they were 1 st.
Mattress st.
Make 1 Left: this is an increase method that creates a new stitch from the strand between 2 existing stitches, and the new stitch leans towards the left. To do it, insert the left-hand needle under the strand between the left and right-hand needles from front to back lifting the strand onto the needle. With the yarn in back, insert the right-hand needle from front to back into the back loop of the stitch. Knit it.
Make 1 Right: increase method that creates a new stitch from the strand between 2 existing stitches, which leans towards the right. To do it, insert the LN from back to front under the strand between the LN and RN, lifting the strand onto the needle. With the yarn in back, insert the RN from front to back into the front loop of the stitch. Knit it.
Purl.
Pick up sts.
Slip st: slip st to the right-hand needle pwise, unless instructed otherwise.
Slip, knit, pass over: sl st to the RN pwise, k the next st, pass the slipped st over the st you just knit.
Sloped bind-off: this bind off forms a smooth curve and prevents “stair steps” to form on the following bind-off rows. To do it, work the first bind-off row as usual to define the initial part of the bind-off. Work the next row to the last st, but do not work it. Instead, turn the work so that the unworked st becomes the first st on the right-hand needle. Keeping the yarn in the back of the work, slip the first st on the left hand needle pwise, then bind off the unworked st by lifting it over the slipped st and off the needle, as for a regular bind-off. This is your first bind-off st. Keep working in this way until you have completed all bind off rows.
Stitch Patterns
Reverse Stockinette st.
P all sts in RS rows and k all sts in WS rows.
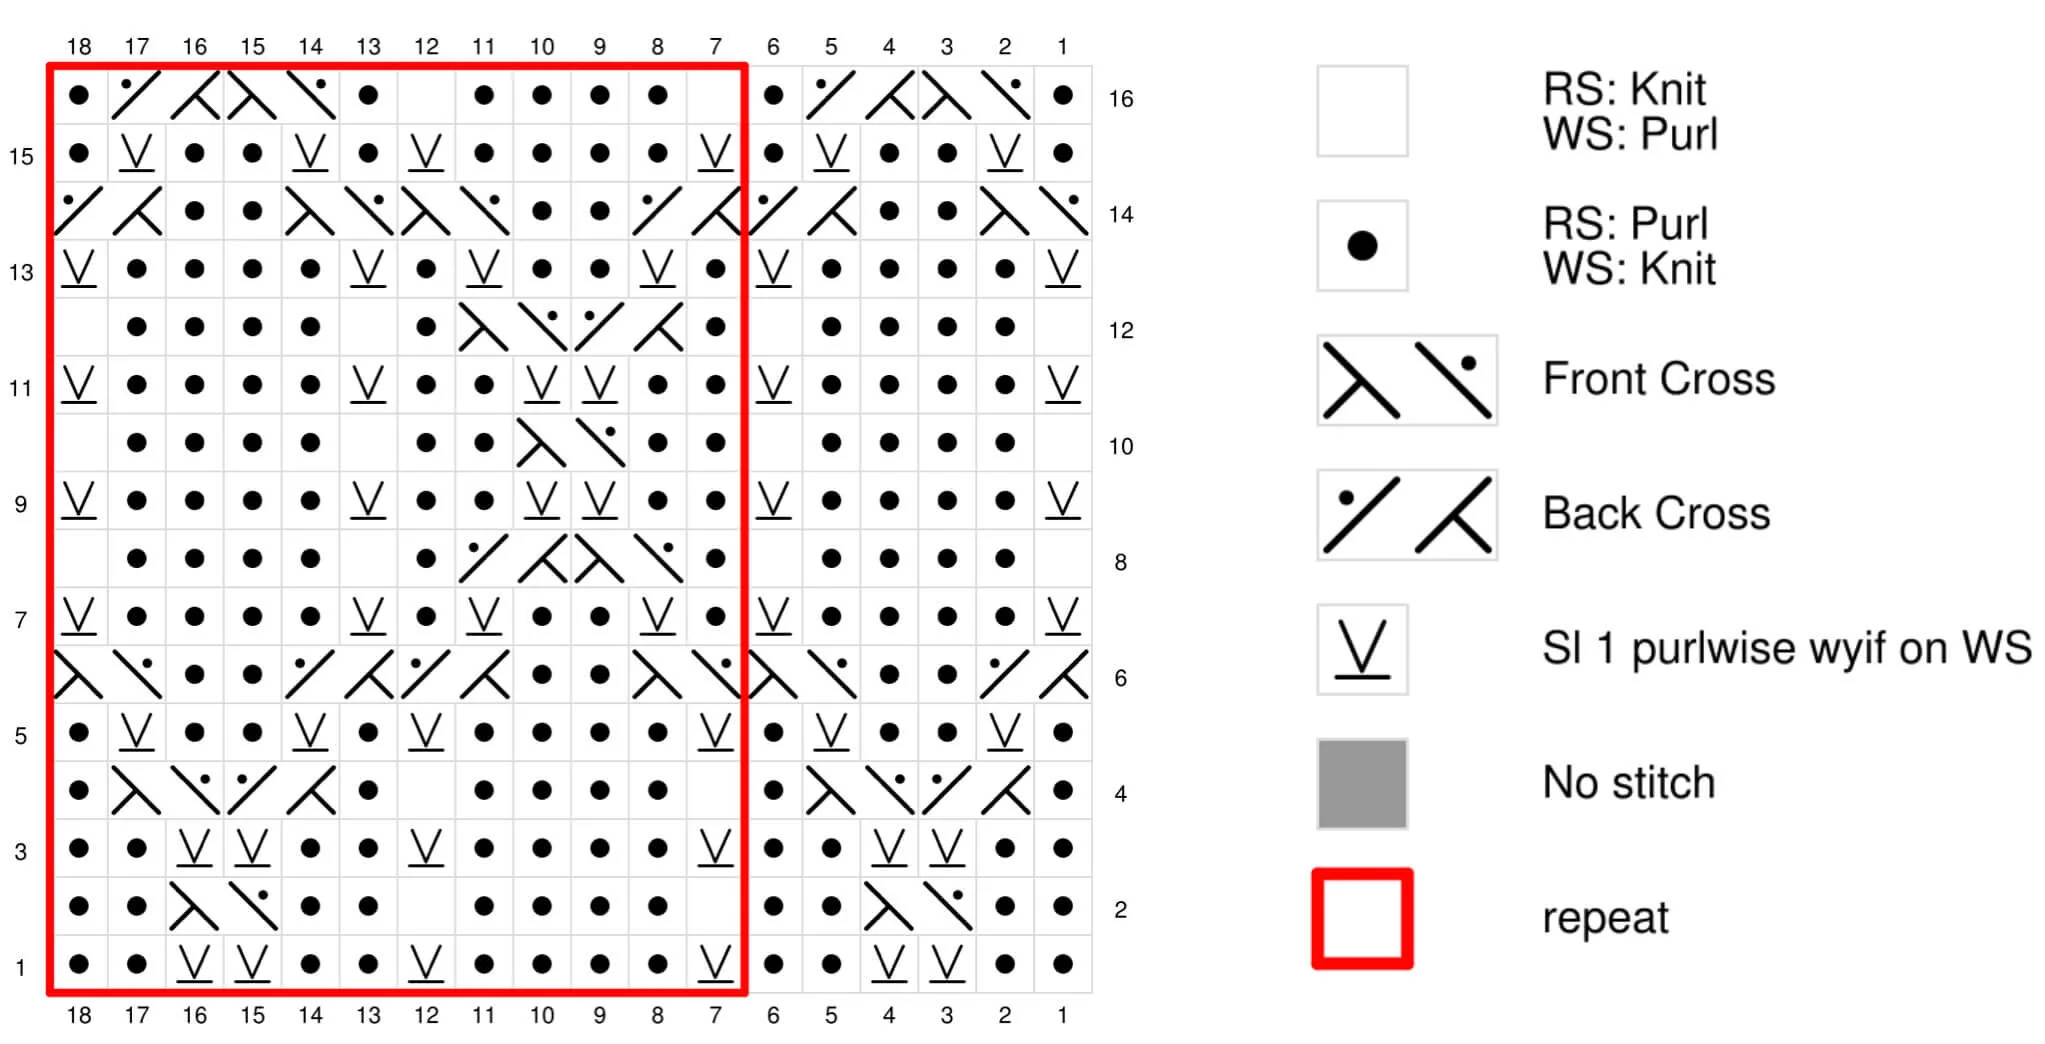
Crossed Loops st
(Multiple of 12 sts + 6)
Rows 1 and 3(WS): *k2, sl 2 wyif, k2, sl 1 wyif, k4, sl 1 wyif; repeat from * to the last 6 stitches, k2, sl 2 wyif, k2.
Row 2: p2, FC, p2. *k1, p4, k1, p2, FC, p2; repeat from * to the end.
Row 4: p1, BC, FC, p1. *k1, p4, k1, p1, BC, FC, p1; repeat from * to the end.
Remaining WS rows, except row 11: k the k sts, sl the p sts wyif.
Row 6: BC, p2, FC. *FC, p2, BC, BC, p2, FC; repeat from * to the end.
Row 8: k1, p4, k1. *p1, FC, BC, p1, k1, p4, k1; repeat from * to the end.
Row 10: k1, p4, k1. *p2, FC, p2, k1, p4, k1; repeat from * to the end.
Row 11: *sl 1 wyif, k4, sl 1 wyif, k2, sl 2 wyif, k2; repeat from * to the last 6 sts, sl 1 wyif, k4, sl 1 wyif.
Row 12: k1, p4, k1. *p1, BC, FC, p1, k1, p4, k1; repeat from * to the end.
Row 14: FC, p2, BC. *BC, p2, FC, FC, p2, BC; repeat from * to the end.
Row 16: p1, FC, BC, p1. *k1, p4, k1, p1, FC, BC, p1; repeat from * to the end.
Repeat rows 1 - 16 for the Crossed Loops st.
Notes
I am a loose knitter. If you are a tight knitter, I advise you to try knitting a gauge swatch with one needle size bigger than stated in pattern.
RS rows are even rows, and WS rows are odd rows. Keep this in mind when BO for the neckline. When BO off sts for the neck, use the sloped bind-off for a cleaner and finished edge.
For best results, read the entire pattern before you start to knit. Send your questions/comments to [email protected]
Let’s knit!
FRONT
CO 116 (128, 152, 164, 176)(188, 200, 212) sts.
Note: According to the length you chose for your Front piece, read the instructions beginning from either the Tunic-length, the Hip-length, or the Cropped length. That is, if you chose the Tunic-length, read the instructions immediately below. If you chose the Hip-length or Cropped length, go to their respective sections .
Tunic-length
Begin Rib
Note: the first and last sts are worked so they have a chain finished because they won’t be seamed. Keep this in mind to match the side seams of your back and front pieces.
For sizes 1 (-, 3, -, -)(-, 7, 8)
Row 1 (WS row): sl 1 wyib, *sl 1 wyif, k4, sl 1 wyif, k2, sl 2 wyif, k2; repeat from * to the last 7 sts, sl 1 wyif, k4, sl 1 wyif, k1.
For sizes -(2, -, 4, 5)(6, -, -)
Row 1 (WS row): sl 1 wyib, *k2, sl 2 wyif, k2, sl 1 wyif, k4, sl 1 wyif; repeat from * to the last 7 stitches, k2, sl 2 wyif, k3.
All sizes
Row 2 (RS row): sl 1 wyib. P the p sts, k the sl sts to last st, p1. Rep rows 1 and 2 six times more (for a total of 14 rows worked) or until piece measures 1 ½”/4 cm from CO, ending by working a RS row.
Begin Crossed Loops st
Keep in mind that depending on the lengths you chose for your back and front pieces, you will either work the first and last st in Rev St st (k the first and last st in the WS rows, and p the first and last st in the RS rows) or in the Chain selvedge (sl the first st wyib and k the last st on WS rows, and sl the first st wyib and p the last st on RS rows) to match the Rib of the back piece. For practicality reasons, the instructions are written with Rev St st as selvedge, but if for example for you picked the Cropped length for the Back piece, continue sl the first st wyib and k the last st on WS rows, and sl the first st wyib and p the last st on RS rows until you reach the Cropped length height.
Row 15 (WS row): k1, work row 9 (9, 9, 1, 1)(9, 9 ,9) of the Crossed Loops st to the last st, k1.
Row 16 (RS row): p1, work row 10 (10, 10, 2, 2)(10, 10, 10) of the Crossed Loops st to the last st, p1.
Continue working the 12-row repeat of the Crossed Loops st as established until you finish working row 71 (79, 55, 63, 47)(31, 39, 23), a WS Row.
Begin slant to the right
Now we’ll start decreasing the Crossed Loops st repeats in order to create the slant to the right. To do so, you will use the skp decrease on the last repeat of the row instead of working the corresponding FC on rows 2 and 10 of the Crossed Loops st pattern. You will place a st marker to remember to work in Rev St st the last stitches on the RS rows, and the first stitches on the WS rows.
Remember to keep in mind the length you choose for the Back piece. The instructions are written with the first and last sts to be worked in Rev St st, but if you chose the hip length or the cropped length, adjust accordingly to work the first and last sts with the Chain Selvedge.
Row 72 (80, 56, 64, 48)(32, 40, 24)(RS row): p3, FC, p2, *k1, p4, k1, p2, FC, p2; repeat from * to the last 13 sts. K1, p4, k1, pm, p2, skp, p3. 1 st decreased. — 115 (127, 151, 163, 175) (187, 199, 211) sts.
Row 73 (81, 57, 65, 49)(33, 41, 25) and the remaining WS rows except rows 79 (87, 63, 71, 55)(39, 47, 31) and 87 (95, 71, 79, 63)(47, 55, 39): k to the marker, sm, k the k sts, sl the p sts wyif.
Row 74 (82, 58, 66, 50)(34, 42, 26): p2, BC, FC, p1, *k1, p4, k1, p1, BC, FC, p1; repeat from * to 6 sts before the marker, k1, p4, k1, sm, p to the end.
Row 76 (84, 60, 68, 52)(36, 44, 28): p1, BC, p2, FC, *FC, p2, BC, BC, p2, FC; repeat from * to 6 sts before the marker, FC, p2, BC, sm, p to the end.
Row 78 (86, 62, 70, 54)(38, 46, 30): p1, k1, p4, k1, *p1, FC, BC, p1, k1, p4, k1; repeat from * to 6 sts before the marker, p1, FC, BC, p1, sm, p to the end.
Row 79 (87, 63, 71, 55)(39, 47, 31): k to the marker, sm, k2, sl 2 wyif, k2, *sl 1 wyif, k4, sl 1 wyif, k2, sl 2 wyif, k2; repeat from * to the last 7 stitches, sl 1 wyif, k4, sl 1 wyif, k1.
Row 80 (88, 64, 72, 56)(40, 48, 32): p1, k1, p4, k1, *p2, FC, p2, k1, p4, k1; repeat from * to to 6 sts before the marker, pm, p2, skp, p2, take marker away, p to the end. 1 st decreased. — 114 (126, 150, 162, 174) (186, 198, 210) sts.
Row 82 (90, 66, 74, 58)(42, 50, 34): p1, k1, p4, k1, *p1, BC, FC, p1, k1, p4, k1; repeat from * to the marker, sm, p to the end.
Row 84 (92, 68, 76, 60)(44, 52, 36): p1, FC, p2, BC, *BC, p2, FC, FC, p2, BC; repeat from * to the marker, sm, p to the end.
Row 86 (94, 70, 78, 62)(46, 54, 38): p2, FC, BC, p1, *k1, p4, k1, p1, FC, BC, p1; repeat from * to the marker, sm, p to the end.
Row 87 (95, 71, 79, 63)(47, 55, 39)(WS row): k to the marker, sm, *k2, sl 2 wyif, k2, sl 1 wyif, k4, sl 1 wyif; repeat from * to the last 7 stitches, k2, sl 2 wyif, k3.
Row 88 (96, 72, 80, 64)(48, 56, 40): p3, FC, p2, *k1, p4, k1, p2, FC, p2; repeat from * to the last 12 sts before the marker, k1, p4, k1, pm, p2, skp, p2, take marker away, p to the end. 1 st decreased. — 113 (125, 149, 161, 173) (185, 197, 209) sts.
Repeat rows 73 (81, 57, 65, 49)(33, 41, 25) to 88 (96, 72, 80, 64)(48, 56, 40) five (five, seven, seven, eight)(nine, nine, ten) times more, and then rows 73 (81, 57, 65, 49)(33, 41, 25) and 74 (82, 58, 66, 50)(34, 42, 26) once more (finishing working row 170 (178, 186, 194, 194)(194, 202, 202), a RS row). — 10 (10, 14, 14, 16)(18, 18, 20) sts decreased. 103 (115, 135, 147, 157)(167, 179, 189) sts left.
Note: Read the neckline shaping instructions before continue knitting. The sloped BO method for the neck edge is incorporated on the RS rows for the left shoulder, and on the WS rows for the right shoulder.

Neckline Shaping
Row 171 (179, 187, 195, 195)(195, 203, 203)(neck BO, WS row): k37 (41, 47, 52, 55)(60, 63, 68) sts for the right shoulder; BO 14 (16, 18, 18, 22) (22, 26, 27) sts, k to the marker, sm, k the k sts, sl the p sts wyif. — 37 (41, 47, 52, 55)(60, 63, 68) sts for the right shoulder and 52 (58, 70, 77, 80)(85, 90, 94) sts for the left shoulder.
Place the 37 (41, 47, 52, 55)(60, 63, 68) sts for the right shoulder on a st holder or scrap of yarn, and put them aside to work them later.
Left shoulder
Row 172 (180, 188, 196, 196)(196, 204, 204): p1, BC, p2, FC, *FC, p2, BC, BC, p2, FC; repeat from * to 6 sts before the marker, FC, p2, BC, sm, p to the last st, turn your work.
Row 173 (181, 189, 197, 197)(197, 205, 205): BO 2 (2, 3, 3, 3)(3, 4, 4) sts (including the one you didn’t work in the last row), k to the marker, sm, k the k sts, sl the p sts wyif. — 50 (56, 67, 74, 77)(82, 86, 90) sts.
Row 174 (182, 190, 198, 198)(198, 206, 206): p1, k1, p4, k1, *p1, FC, BC, p1, k1, p4, k1; repeat from * to 6 sts before the marker, p1, FC, BC, p1, sm, p to the last st, turn your work.
Row 175 (183, 191, 199, 199)(199, 207, 207): BO 2 (2, 2, 2, 3)(3, 3, 4) sts (including the one you didn’t work in the last row), k to the marker, sm, k2, sl 2 wyif, k2. *sl 1 wyif, k4, sl 1 wyif, k2, sl 2 wyif, k2; repeat from * to the last 6 stitches, sl 1 wyif, k4, sl 1 wyif, k1. — 48 (54, 65, 72, 74)(79, 83, 86) sts.
Row 176 (184, 192, 200, 200)(200, 208, 208): p1, k1, p4, k1, *p2, FC, p2, k1, p4, k1; repeat from * to to 6 sts before the marker, pm, p2, skp, p2, take marker away, p to the last st, turn your work. 1 st decreased. — 47(53, 64, 71, 73)(78, 82, 85) sts.
Row 177 (185, 193, 201, 201)(201, 209, 209): BO 2 (2, 2, 2, 3)(3, 3, 3) sts (including the one you didn’t work in the last row), k to the marker, sm, k the k sts, sl the p sts wyif. — 45 (51, 62, 69, 70)(75, 79, 82) sts.
Row 178 (186, 194, 202, 202)(202, 210, 210): p1, k1, p4, k1, *p1, BC, FC, p1, k1, p4, k1; repeat from * to the marker, sm, p to the last st, turn your work. Row 179 (187, 195, 203, 203)(203, 211, 211): BO 1 (2, 2, 2, 2)(2, 2, 3) st (including the one you didn’t work in the last row), k to the marker, sm, k the k sts, sl the p sts wyif. — 44 (49, 60, 67, 68)(73, 77, 79) sts.
Row 180 (188, 196, 204, 204)(204, 212, 212): p1, FC, p2, BC, *BC, p2, FC, FC, p2, BC; repeat from * to the marker, sm, p to the end.
Row 181 (189, 197, 205, 206)(205, 213, 213): k to the marker, sm, k the k sts, sl the p sts wyif.
Row 182 (190, 198, 206, 206)(206, 214, 214): p2, FC, BC, p1, *k1, p4, k1, p1, FC, BC, p1; repeat from * to the marker, sm, p to the end.
BO all the sts in pattern (as if you were working another row, but bind them off).
Right shoulder
Join a ball of yarn and pick up the sts for the right shoulder by placing them in your needle again with the RS facing you, work as follows in Rev St st starting with a RS row and keeping in mind the following BOs:
BO 2 ( 2, 3, 3, 3)(3, 4, 4) sts at the beginning of the next 3 (4, 1, 1, 3) (3, 1, 2) RS rows and 1 (0, 2, 2, 2)(2, 3, 3) sts at the beginning of the next 1 (0, 3, 3, 1) (1, 3, 2) RS row. — 30 (33, 38, 43, 44) (49, 50, 54) sts.
Remaining WS rows: k to the last st, turn your work.
Work even for 2 more rows, p the first and last st of the Right Shoulder, ending by working a RS row, that is, Row 182 (190, 198, 206, 206)(206, 214, 214).
BO all sts in pattern.
Hip-length
Begin Rib
Note: the first and last sts are worked so they have a chain finished because they won’t be seamed. Keep this in mind to match the side seams of your back and front pieces.
For sizes 1 (-, 3, 4, -)(-, -, -)
Row 1 (WS row): sl 1 wyib, *k2, sl 2 wyif, k2, sl 1 wyif, k4, sl 1 wyif; repeat from * to the last 7 stitches, k2, sl 2 wyif, k3.
For sizes - (2, -, -, 5)(6, 7, 8)
Row 1 (WS row): sl 1 wyib, *sl 1 wyif, k4, sl 1 wyif, k2, sl 2 wyif, k2; repeat from * to the last 7 sts, sl 1 wyif, k4, sl 1 wyif, k1.
All sizes
Row 2 (RS row): sl 1 wyib. P the p sts, k the sl sts to last st. P1.
Rep rows 1 and 2 six times more (for a total of 14 rows worked) or until piece measures 1 ½”/4 cm from CO, ending by working a RS row.
Sizes 1 (2, 3, 4, 5)(-, -, -)
Begin Crossed Loops st
Keep in mind that depending on the lengths you chose for your back and front pieces, you will either work the first and last st in Rev St st (k the first and last st in the WS rows, and p the first and last st in the RS rows) or in the Chain selvedge (sl the first st wyib and k the last st on WS rows, and sl the first st wyib and p the last st on RS rows) to match the Rib of the back piece. For practicality reasons, the instructions are written with Rev St st as selvedge, but if for example for you picked the Cropped length for the Back piece, continue sl the first st wyib and k the last st on WS rows, and sl the first st wyib and p the last st on RS rows until you reach the Cropped length height.
Note: The number of rows below start with Row 47, so they match the rows from the Tunic length instructions, which you will follow after finishing this section.
Row 47 (WS row): k1, work row 9 (1, 9, 1, 1)(-, -, -) of the Crossed Loops st to the last st, k1.
Row 48 (RS row): p1, work row 10 (2, 10, 2, -)(-, -, -) of the Crossed Loops st to the last st, p1.
Continue working the 12-row repeat of the Crossed Loops st as established until you finish working row 71 (79, 55, 63, 47)(-, -, -), which is a WS Row. Go to the Tunic Length Section, under the “Begin slant to the right” (page 12) and follow the instructions from row 72 (80, 56, 64, 48)(-, -, -) until the bind off for the right and left shoulder.
Sizes - ( -, -, -, -)(6, 7, 8)
Begin slant to the right
Now we are going to start the Crossed Loops st pattern, but also the Rev St st pattern. To do so, we are going to use the k2tog decrease, and place a st marker in the row to mark the divide between both st patterns.
Note: The number of rows below start with Row - (-, -, -, -)(39, 47, 47), so they match the rows from the Tunic length instructions, which you will follow after finishing this section.
Row - (-, -, -, -)(39, 47, 47): k1, *k2, k2tog, k2; repeat from * - (-, -, -, -)(zero, zero, two) times more, pm, k2, sl 2 wyif, k2. *sl 1 wyif, k4, sl 1 wyif, k2, sl 2 wyif, k2; repeat from * to the last 7 stitches, sl 1 wyif, k4, sl 1 wyif, k1. - (-, -, -, -)(1, 1, 3) sts decreased. — - (-, -, -, -)(187, 199, 209) sts.
Now go to the Tunic Length Section, under the “Begin st slant to the right” and follow the instructions starting from Row - (-, -, -, -)(40, 48, 32) (RS row) until the Bind Off for the right and left shoulder.
Note for size 9: Even though you will be following the instructions from row 32, don’t forget that you are on row 48, so instead of completing that set of instructions TEN times more, only repeat them NINE times more. You will still finish by working row 202.
Cropped Length
Begin Rib
Note: the first and last sts are worked so they have a chain finished because they won’t be seamed. Keep this in mind to match the side seams of your back and front pieces.
For sizes 1 (-, 3, -, -)(6, 7, 8)
Row 1 (WS row): sl 1 wyib, *sl 1 wyif, k4, sl 1 wyif, k2, sl 2 wyif, k2; repeat from * to the last 7 sts, sl 1 wyif, k4, sl 1 wyif, k1.
For sizes - (2, -, 4, 5)(-, -, -)
Row 1 (WS row): sl 1 wyib, *k2, sl 2 wyif, k2, sl 1 wyif, k4, sl 1 wyif; repeat from * to the last 7 sts, k2, sl 2 wyif, k3.
All sizes
Row 2 (RS row): sl 1 wyib. P the p sts, k the sl sts to last st. P1.
Rep rows 1 and 2 six times more (for a total of 14 rows worked) or until piece measures 1 ½”/4 cm from CO, ending by working a RS row.
Sizes 1 (2, -, -, -)(-, -, -)
Begin Crossed Loops st
Keep in mind that depending on the lengths you chose for your back and front pieces, you will either work the first and last st in Rev St st (k the first and last st in the WS rows, and p the first and last st in the RS rows) or in the Chain selvedge (sl the first st wyib and k the last st on WS rows, and sl the first st wyib and p the last st on RS rows) to match the Rib of the back piece. For practicality reasons, the instructions are written with Rev St st as selvedge, but if for example for you picked the Cropped length for the Back piece, continue sl the first st wyib and k the last st on WS rows, and sl the first st wyib and p the last st on RS rows until you reach the Cropped length height.
Note: The number of rows below start with Row 71, so they match the rows from the Tunic length instructions, which you will follow after finishing this section.
Row 71 (WS row): k1, work row 1 (9, -, -, -)(-, -, -) of the Crossed Loops st to the last st, k1.
Row 72 (RS row): p1, work row 2 (10, -, -, -)(-, -, -) of the Crossed Loops st to the last st, p1.
Continue working the 12-row repeat of the Crossed Loops st as established until you finish working row 71 (79, -, -, -)(-, -, -), a WS Row. Go to the Tunic Length Section, under the “Begin st slant to the right” (page 12) and follow the instructions from row 72 (80, -, -, -)(-, -, -) until the Bind Off for the right and left shoulder.
Sizes - ( -, 3, 4, -)(-, -, -)
Begin slant to the right
Now we are going to start the Crossed Loops st pattern, but also the Rev St st pattern. To do so, we are going to use the k2tog decrease, and place a st marker in the row to mark the divide between both st patterns.
Note: The number of rows below start with Row - (-, 71, 79, -)(-, -, -), so they match the rows from the Tunic length instructions, which you will follow after finishing this section.
Row - (-, 71, 79, -)(-, -, -): k1, *k2, k2tog, k2; repeat from * - (-, one, one, -)(-, -, -) times more, pm, *k2, sl 2 wyif, k2, sl 1 wyif, k4, sl 1 wyif; repeat from * to the last 7 stitches, k2, sl 2 wyif, k3. - (-, 2, 2, -)(-, -, -) sts decreased. — - (-, 150, 162, -)(-, -, -) sts.
Now go to the Tunic Length Section, under the “Begin st slant to the right” and follow the instructions starting from Row - (-, 72, 80, -)(-, -, -)(RS row) until the Bind Off for the right and left shoulder.
Sizes - ( -, -, -, 5)(6, 7, 8)
Begin slant to the right
Now we are going to start the Crossed Loops st pattern, but also the Rev St st pattern. To do so, we are going to use the k2tog decrease, and place a st marker in the row to mark the divide between both st patterns.
Note: The number of rows below start with Row - (-, -, -, 71)(71, 79, 79), so they match the rows from the Tunic length instructions, which you will follow after finishing this section.
Row - (-, -, -, 71)(71, 79, 79): k1, *k2, k2tog, k2; repeat from * -(-, -, -, two)(four, four, six) times more, pm, k2, sl 2 wyif, k2. **sl 1 wyif, k4, sl 1 wyif, k2, sl 2 wyif, k2; repeat from ** to the last 7 stitches, sl 1 wyif, k4, sl 1 wyif, k1. - (-, -, -, 3)(5, 5, 7) sts decreased. — - (-, -, -, 173)(183, 195, 205) sts.
Now go to the Tunic Length Section, under the “Begin st slant to the right” (page 12) and follow the instructions starting from Row - (-, -, -, 56)(40, 48, 32) (RS row) until the Bind Off for the right and left shoulder.
Note: Even though you will be following the instructions from Row -(-, -, -, 56) (40, 48, 32), don’t forget that you are on Row - (-, -, -, 72)(72, 80, 80), so instead of completing that set of instructions - (-, -, -, eight)(nine, nine, ten) times more, only repeat them SEVEN times more. You will still finish by working row - (-, -, -, 194)(194, 202, 202).
BACK
CO 116 (128, 152, 164, 176)(188, 200, 212) sts.
Note: According to the length you chose for your Front piece, read the instructions beginning from either the Tunic-length, the Hip-length, or the Cropped length. That is, if you chose the Tunic-length, read the instructions immediately below. If you chose the Hip-length or Cropped length, go to their respective sections on page 24 for the Hip-length and on page 25 for the Cropped length.
Tunic-length
Work the same as the Tunic-length Front until you finish working row 71 (79, 55, 63, 47)(31, 39, 23), which is a WS row.
Begin slant to the left
Note: Remember to keep in mind the length you choose for the Front piece. The instructions are written with the first and last sts to be worked in Rev St st, but if you chose the hip length or the cropped length for the Front, adjust accordingly to work the first and last sts with the Chain Selvedge until you reach the desired length.
Row 72 (80, 56, 64, 48)(32, 40, 24)(RS row): p3, skp, p2, pm, *k1, p4, k1, p2, FC, p2; repeat from * until there is 1 stitch left, p1. 1 st decreased. — 115 (127, 151, 163, 175) (187, 199, 211) sts.
Row 73 (81, 57, 65, 49)(33, 41, 25) and the remaining WS rows except rows 79 (87, 63, 71, 55)(39, 47, 31) and 87 (95, 71, 79, 63)(47, 55, 39): k1, k the k sts, sl the p sts wyif to the marker, sm, k5.
Row 74 (82, 58, 66, 50)(34, 42, 26): p to the marker, sm, *k1, p4, k1, p1, BC, FC, p1; repeat from * to the last st, p1.
Row 76 (84, 60, 68, 52)(36, 44, 28): p to the marker, sm, *FC, p2, BC, BC, p2, FC; repeat from * to the last st, p1.
Row 78 (86, 62, 70, 54)(38, 46, 30): p to the marker, sm, *p1, FC, BC, p1, k1, p4, k1; repeat from * to the last st, p1.
Row 79 (87, 63, 71, 55)(39, 47, 31): k1, *sl 1 wyif, k4, sl 1 wyif, k2, sl 2 wyif, k2; repeat from * to the marker, k to end.
Row 80 (88, 64, 72, 56)(40, 48, 32): p to the marker, take marker away, p2, skp, p2, pm, k1, p4, k1, *p2, FC, p2, k1, p4, k1; repeat from * to the last st, p1. 1 st decreased. — 114 (127, 150, 162, 174) (186, 198, 210) sts.
Row 82 (90, 66, 74, 58) (42, 50, 34): p to the marker, sm, k1, p4, k1, *p1, BC, FC, p1, k1, p4, k1; repeat from * to the last st, p1.
Row 84 (92, 68, 76, 60)(44, 52, 36): p to the marker, sm, FC, p2, BC, *BC, p2, FC, FC, p2, BC; repeat from * to the last st, p1.
Row 86 (94, 70, 78, 62)(46, 54, 38): p to the marker, sm, p1, FC, BC, p1, *k1, p4, k1, p1, FC, BC, p1; repeat from * to the last st, p1.
Row 87 (95, 71, 79, 63)(47, 55, 39)(WS row): k1, *k2, sl 2 wyif, k2, sl 1 wyif, k4, sl 1 wyif; repeat from * to the last 6 sts before the marker, k2, sl 2 wyif, k2, sm, k to end.
Row 88 (96, 72, 80, 64)(48, 56, 40): p to the marker, take marker away, p2, skp, p2, pm, *k1, p4, k1, p2, FC, p2; repeat from * to the last st, k1. 1 st decreased. — 113 (125, 149, 161, 173) (185, 197, 209) sts.
Repeat rows 73 (81, 57, 65, 49)(33, 41, 25) to 88 (96, 72, 80, 64)(48, 56, 40) five (five, seven, seven, eight)(nine, nine, ten) times more, and then rows 73 (81, 57, 65, 49)(33, 41, 25) to 82 (90, 66, 74, 58) (42, 50, 34) once more (finishing working row 178 (186, 194, 202, 202)(202, 210, 210), a RS row). — 11 (11, 15, 15, 17)(19, 19, 21) sts decreased. 102 (114, 134, 146, 156)(166, 178, 189) sts left.
Note: Read the neckline shaping instructions before continue knitting. The sloped BO method for the neck edge is incorporated on the RS rows for the right shoulder.
Neckline Shaping
Row 179 (187, 195, 203, 203)(203, 211, 211)(neck BO, WS row): k1, k the k sts, sl the p sts wyif to the marker, sm, k18 (11, 23, 18, 20)(25, 18, 22) for the left shoulder; BO 18 (22, 24, 24, 30) (30, 34, 36) sts, k to end. — 35 (38, 44, 49, 51) (56, 59, 63) sts for the right shoulder and 49 (54, 66, 73, 75) (80, 85, 89) sts for the left shoulder.
Place the 49 (54, 66, 73, 75) (80, 85, 89) sts for the left shoulder on a st holder or scrap of yarn, and put them aside to work them later.
Right shoulder
Row 180 (188, 196, 204, 204)(204, 212, 212)(RS row): k to last st, turn your work.
Row 181 (189, 197, 205, 205)(205, 213, 213): BO 5 (5, 6, 6, 7)(7, 9, 9) sts (including the one you didn’t work in the last row), k to end — 30 (33, 38, 43, 44)(49, 50, 54) sts.
Row 182 (190, 198, 206, 206)(206, 214, 214): k to end.
BO all sts in pattern.
Left shoulder
Join a ball of yarn and pick up the sts for the left shoulder by placing them in your needle again with the RS facing you, work as follows in in the established Rev St st and Crossed Loops st pattern starting with a RS row and keeping in mind the following BOs:
Row 180 (188, 196, 204, 204)(204, 212, 212)(RS row): BO 5 (5, 6, 6, 7)(7, 9, 9) sts, p to the marker, sm, FC, p2, BC. *BC, p2, FC, FC, p2, BC; repeat from * to the last st, p1. — 44 (49, 60, 67, 68) (73, 76, 80) sts.
Row 181 (189, 197, 205, 205)(205, 213, 212)(neck BO, WS row): k1, k the k sts, sl the p sts wyif to the marker, sm, k to end.
Row 182 (190, 198, 206, 206)(206, 214, 214): p to the marker, sm, p1, FC, BC, p1, *k1, p4, k1, p1, FC, BC, p1; repeat from * to the last st, p1.
BO all sts in pattern.
Hip-length
Sizes 1 (2, 3, 4, 5)(-, -, -)
Work the same as the Hip-length Front for sizes 1(2, 3, 4, 5)(-, -, -) until you finish working row 71 (79, 55, 63, 47)(-, -, -), a WS row. Then, go to the Back Tunic-Length Section, under the “Begin slant to the left” and follow the instructions from row 72 (80, 56, 64, 48)(-, -, -) until the bind odd for the right and left shoulder.
Sizes - ( -, -, -, -)(6, 7, 8)
Work the same as the Hip-length Front (page 16) until you finish working the “Begin Rib” Section for sizes - ( -, -, -, -)(6, 7, 8).
Begin slant to the left
Now we are going to start the Crossed Loops st pattern, but also the Rev St st pattern. To do so, we are going to use the k2tog decrease, and place a st marker in the row to mark the divide between both st patterns.
Note: The number of rows below start with Row - (-, -, -, -)(39, 47, 47), so they match the rows from the Back Tunic-length instructions, which you will follow after finishing this section.
Row - (-, -, -, -)(39, 47, 47): k1, *sl 1 wyif, k4, sl 1 wyif, k2, sl 2 wyif, k2; repeat from * until there are - (-, -, -, -)(7, 7, 19) sts left, pm, **k2, k2tog, k2; repeat from ** - (-, -, -, -)(zero, zero, two) times more, k1. - (-, -, -, -)(1, 1, 3) sts decreased. — - (-, -, -, -)(187, 199, 209) sts.
Now go to the Back Tunic-Length Section, under the “Begin st slant to the left” (page 21) and follow the instructions starting from Row - (-, -, -, -)(40, 48, 32) (RS row) until the Bind Off for the right and left shoulder.
Note for size 9: Even though you will be following the instructions from row 32, don’t forget that you are on row 48, so instead of completing that set of instructions TEN times more, only repeat them NINE times more. You will still finish by working row 202.
Cropped Length
Sizes 1 (2, -, -, -)(-, -, -)
Work the same as the Crop-length Front for sizes 1 (2, -, -, -)(-, -, -) until you finish working row 71 (79, -, -, -)(-, -, -), a WS row. Then, go to the Back Tunic-Length Section, under the “Begin slant to the left” and follow the instructions from row 72 (80, 56, 64, 48)(32, 40, 24) until the Bind Off for the right and left shoulder.
Sizes - ( -, 3, 4, 5)(6, 7, 8)
Work the same as the Cropped-length Front until you finish working the “Begin Rib” Section for your corresponding size.
Sizes - ( -, 3, 4, -)(-, -, -)
Begin slant to the left
Now we are going to start the Crossed Loops st pattern, but also the Rev St st pattern. To do so, we are going to use the k2tog decrease, and place a st marker in the row to mark the divide between both st patterns.
Note: The number of rows below start with Row - (-, 71, 79, -)(-, -, -), so they match the rows from the Tunic length instructions, which you will follow after finishing this section.
Row - (-, 71, 79, -)(-, -, -): k1, *k2, sl 2 wyif, k2, sl 1 wyif, k4, sl 1 wyif; repeat from * until there are - (-, 21, 21, -)(-, -, -) sts left, k2, sl 2 wyif, k2, pm, **k2, k2tog, k2; repeat from ** - (-, one, one, -)(-, -, -) times more, k1. - (-, 2, 2, -)(-, -, -) sts decreased. — - (-, 150, 162, -)(-, -, -) sts.
Now go to the Back Tunic-Length Section, under the “Begin st slant to the left” and follow the instructions starting from Row - (-, 72, 80, -)(-, -, -)(RS row) until the Bind Off for the right and left shoulder.
Sizes - ( -, -, -, 5)(6, 7, 8)
Begin slant to the left
Now we are going to start the Crossed Loops st pattern, but also the Rev St st pattern. To do so, we are going to use the k2tog decrease, and place a st marker in the row to mark the divide between both st patterns.
Note: The number of rows below start with Row - (-, -, -, 71)(71, 79, 79), so they match the rows from the Back Tunic length instructions, which you will follow after finishing this section.
Row - (-, -, -, 71)(71, 79, 79): k1, *sl 1 wyif, k4, sl 1 wyif, k2, sl 2 wyif, k2; repeat from * until there are - (-, -, -, 19)(31, 31, 43) sts left, pm, **k2, k2tog, k2; repeat from ** - (-, -, -, two)(four, four, six) times more, k1. - (-, -, -, 3)(5, 5, 7) sts decreased. — - (-, -, -, 173)(183, 195, 205).
Now go to the Back Tunic-Length Section, under the “Begin st slant to the left” and follow the instructions starting from Row - (-, -, -, 56)(40, 48, 32) (RS row) until the Bind Off for the right and left shoulder.
Note: Even though you will be following the instructions from Row - (-, -, -, 56)(40, 48, 32), don’t forget that you are on Row - (-, -, -, 72)(72, 80, 80), so instead of completing that set of instructions - (-, -, -, eight)(nine, nine, ten) times more, only repeat them SEVEN times more. You will still finish by working row - (-, -, -, 194)(194, 202, 202).
SLEEVES
Left sleeve
Cast on 50 (56, 62, 68, 68)(74, 74, 74) sts.
Sizes 1 (-, 3, -, -)(6, 7, 8)
Row 1 (WS): k1, *k2, sl 2 wyif, k2, sl 1 wyif, k4, sl 1 wyif; repeat from * to last st, k1.
Sizes - (2, -, 4, 5)(-, -, -)
Row 1 (WS): k1, sl 1 wyif, k4, sl 1 wyif, *k2, sl 2 wyif, k2, sl 1 wyif, k4, sl 1 wyif; repeat from * to last st, k1.
All sizes
Row 2: P the p sts, k the sl sts.
Rep rows 1 and 2 six times more (for a total of 14 rows worked) or until piece measures 1 ½”/4 cm from CO, ending by working a RS row.
Sizes 1 (-, 3, -, -)(6, 7, 8)
Row 15 (increase row, WS): k1, m1R, [work row 1 of the Crossed Loops st] to last st, m1L, k1. 2 sts increased — 52 (-, 64, -, -)(76, 76, 76) sts.
Sizes - (2, -, 4, 5)(-, -, -)
Row 15 (increase row, WS): k1, m1R, sl 1 wyif, k4, sl 1 wyif, [work row 1 of the Crossed Loops st] to last st, m1L, k1. 2 sts increased — - (58, -, 70, 70)(-, -, -) sts.
All sizes
Continue working in the established pattern for the Crossed Loops st, starting an extra Crossed Loops st repeat once you have 6 more sts after the selvedge sts (1 at each side); and repeat the increase row every 10th (10th, 6th, 6th, 4th)(6th, 4th, 4th) row two (eight, seventeen, eleven, twenty-six) (three, twenty-three, twenty-two) times and then every 8th (8th, 4th, 4th, 0) (4th, 2nd, 2nd) row eleven (four, one, eleven, zero)(twenty-one, seven, ten) times. — At the end of row 124 (128, 122, 126, 120)(118, 122, 124) you will have 78 (82, 100, 114, 122)(124, 136, 140) sts.
Work even for another 8 rows, ending by working a RS row. BO all sts.
Right sleeve
Work the same as for the left sleeve until you finish working row 14 (RS).
Row 15 (decrease row, WS): k2, k2tog, [k2 (4, 4, 4, 4)(4, 4, 4), k2tog] eleven (one, one, one, one)(two, two, two) times; [k 0 (2, 2, 2, 2)(2, 2, 2), k2tog] zero (eight, eleven, fourteen, fourteen)(eleven, eleven, eleven) times; and [k 0 (4, 4, 0, 0)(4, 4, 4), k2tog] zero (two, one, zero, zero)(two, two, two) times, k2. 12 (12, 14, 16, 16)(16, 16, 16) sts decreased. — 38 (44, 48, 52, 52)(58, 58, 58) sts. Row 16 and the remaining RS rows: p all sts.
Row 17 (increase row, WS): k1, m1R, k to last st, m1L, k1. 2 sts increased — 40 (46, 50, 54, 54)(60, 60, 60) sts.
Row 19 and the remaining non-increase rows: k all sts.
Repeat the increase row every 12th (14th, 8th, 8th, 6th)(6th, 6th, 6th) row three (one, ten, three, eleven)(fourteen, eight, five) times more, and then every 10th (12th, 6th, 6th, 4th)(4th, 4th, 4th) row seven (eight, four, fourteen, nine)(four, fourteen, nineteen) times more. — At the end of row 124 (128, 122, 126, 120)(118, 122, 124) you will have 60 (64, 78, 88, 94)(96, 104, 108) sts.
Work even for another 8 rows, ending by working a RS row. BO all sts.
Finishing
Block pieces to measurements. Align the back and front with the RS facing up, and sew the right shoulder seam.
With the RS facing you, and starting with the front’s left shoulder edge, pick up as many sts around the front and back’s neck as you comfortably can, you should end up with multiple of 6 + 2 sts, for example, 62 sts total (10x6= 60; +2 = 62).
Work in the same Rib st as the sleeves, p the first and last st on the RS and k the first and last st on the WS; until the band measures 1 ½”/4 cm from picking up edge. BO sts loosely, or with a bigger needle size than the one you used to knit.
Sew the left shoulder seam and the neck seam.
Sew sleeves to armholes. Sew sleeves and body sides, taking care of matching the Rev St st selvedge of the body. Weave ends in.
And now your Chubasco Sweater is ready for you to rock it!
You can share your handknits with the KBD community tagging me and using the hashtags #ChubascoSweater and #katebarriosdesigns
Credits
Tech editor: Catherine Whelan (@snooptiggercrafts)
Copyrights
Copyright Kate Barrios Designs, 2021. You are welcome to sell finished items of this pattern, but please give credit to my design linking my website and social media.
You are not allowed to alter this pattern and sell a similar one.
Version 1, August 2021.


