
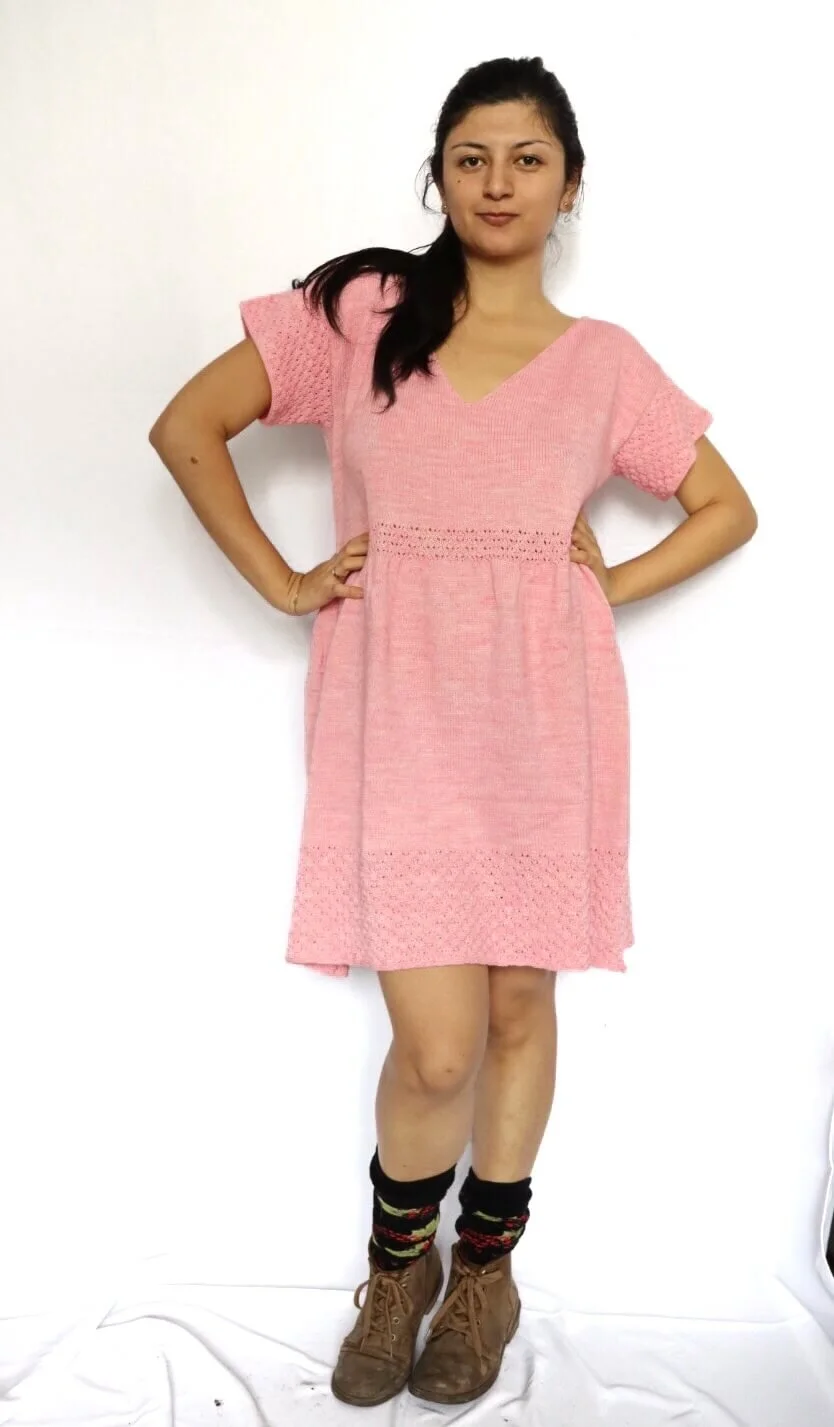
The Soñadora Dress
An intermediate-friendly knitted dress – my Soñadora Dress – is a free pattern here on the blog! Read through my inspiration, materials and stitch patterns used. Or scroll on down for the free pattern.
Introduction + Design
The Soñadora Dress has mid-thigh length, short sleeves, and a V-neck. It has a loose fit, and the shaping occurs at the waistline and for the V-neck in the front of the bodice. The pattern features Stockinette stitch, and a Rosebud Trellis stitch lace for the bottom edge, the waist, and the sleeves.
It's worked in the round, bottom up, until the armhole. There the stitches for the front and back are divided, and then the left front shoulder and right front shoulder stitches are divided too. All the sections will be worked back and forth from then on. The shoulder seams are joined, and then the sleeve sts are picked to be worked in the round.

Don’t miss the chance to win some yarn!
As part of the launch week of this lovely pattern, Purrl Kitten and I teamed up to have a Giveaway! You can win the PDF pattern (ad-free and large print) and 2 skeins of Purrl Kitten’s Toe Bean Sock in the Eat Me colorway! How to participate? Just follow both me (@kate.barrios.designs) and Purrl Kitten (@purrlkitten) on Instagram, like this post, and comment it by tagging a friend, and you’ll automatically enter. You can enter the Giveaway until Monday February the 15th/2021, and we’ll anounce the winner on the 17th. The Giveaway is open worldwide, so be sure to enter and share it with all your friends!
Spring and Summer, here we come!
This dress is so versatile you’ll want to wear it everywhere, and with everything! Combat boots, high-heels, flats. It’s flirty and romantic, and it has a loose fit to it to make it the most comfortable dress you’ll ever wear, without loosing the feminine shape.
Sizes for everyone!
This dress fits bust sizes from 30 to 62 inches, due to the intended ease which is meant to be worn with! The relax fit is so liberating, and combined with the ultra feminine stitches, it’s the perfect combination.
Do you want to improve your knitting skills?
Then this pattern is ideal! It has a little bit of shaping for the waist and in the in the front neckline, and you’ll get a chance to work the Stockinette stitch with no end in the round, so you’ll have a dose of mindless knitting too!


Pattern
Get the ad-free, large print, printable PDF pattern on Ravelry HERE (plus the Soñadora Hair Tie Pattern, at no extra cost!, only applies on Ravelry) and on Etsy HERE.
PIN this pattern to your Pinterest boards for later HERE.
Techniques Required
● Knit stitch
● Purl stitch
● Yarn over.
● Work in the round with circular needles
● Decrease
● Pick up stitches
● Seaming (horizontal)
● Working from charts or written instructions.
● Blocking
Yarn
Recommended Yarn
Or
Fine Weight yarn; 75% superwash merino wool, 25% nylon.
Yardage
Note: Sizes 1 to 7 include a 10% safety yardage, and sizes 8 and 9 include a 5% safety yardage.

Materials
Needles
US 2.5 [3 mm] circular needles Sizes 1-2: 16” / 40 cm and 24” / 60 cm cable lengths.
Sizes 3-9: 16” / 40 cm and 30” / 80 cm cable lengths.
Note: Adjust needle sizes to obtain gauge.
Notions
● Tapestry needle.
● 1 Stitch marker or scrap yarn.
● 2 Stitch holders or scrap yarn.
Gauge
Stockinette Stitch in the round, after blocking:
31.5 sts x 43 rounds = 4 x 4” (10 x 10 cm)
The round gauge is most important for this pattern when working the Neckline Shaping in the front, so make sure to achieve it. If you end up with less rounds per inch than the original gauge, you will end up with a longer bodice. If you end up with more rounds per inch than the original gauge, you can work the pattern keeping in mind the total lengths mentioned in each section.
Take time to save time; check your gauge.
Sizes
1(2, 3, 4, 5)(6, 7, 8, 9)
To fit with + 0-4” / 0-10 cm of ease at the bust.
Note: Sample was knit in Size 4, to fit the model with a 38” / 98 cm bust.
Finished Measurements
Bust at underarm: 28 ½ (32, 36, 40 ½, 44 ½) (48, 52, 56 ½, 60 ½)”/72 (82, 91.5, 103, 113) (122.5, 132, 144, 153.5) cm.
Finished Length: 37 (38, 40 ¼, 41 ¼, 42 ¾)(44 ¼, 45 ¼, 46 ½, 47 ¾)/74.5 (77, 79, 81.5, 84.5)(86, 88.5, 89.5, 91) cm.
Notes
I am a loose knitter. If you are a tight knitter, I advise you to try knitting a gauge swatch with one needle size bigger than stated in pattern.
For best results, read the entire pattern before you start to knit. Send your questions /comments to [email protected]
Abbreviations
BOR: beginning of the round cm: centimeter
k: knit
k2tog: knit 2 together
kwise: knitwise
p: purl
pwise: purlwise
RS: right Side
sl: slip
st(s): stitch(es)
skp: slip, knit, pass over
sk2p: slip 1 kwise, knit 2 together, pass the slipped stitch over knit 2 together you just did
ssk: slip, slip, knit
sssk: slip, slip, slip, knit
yo: yarn over
WS: wrong Side
wyib: with yarn in the back
wyif: with yarn in the front
Techniques
Knit 2 together: insert the needle through the front loops of the first 2 sts on the LN and k them together as if they were 1 st.
Slip st: slip st to the RN pwise, unless instructed otherwise.
Slip, knit, pass over: sl st to the RN pwise, k the next st, pass the slipped st over the st you just knit.
Slip, knit 2 together, pass over: sl st to the Right-hand needle kwise, k the next 2 sts together, pass the slipped st over the k2tog you just did.
Slip, slip, knit: sl next 2 sts to the RN, one by one, kwise. Slide the LN into the front loops of the slipped sts and knit them together.
Slip, slip, slip, knit: sl next 2 sts to the Right-hand needle, one by one, knitwise. Sl the next st pwise to the Right-hand needle. Slide the left hand needle into the front loops of the 3 slipped sts and knit them together through the back loop.
Yarn over: bring the working yarn over your needle from front to back.
Stitch Patterns
Stockinette st.
When working in the round, knit all stitches in all rounds.
When working back and forth, knit all stitches in Right Side rows and purl all stitches in Wrong Side rows.
Garter st.
Knit all stitches in odd numbered rounds and purl all stitches in even numbered rounds.
Rosebud trellis st.
Multiple of 6 sts + 7 (in the round)
Round 1: k2tog, k1, yo, k1, *yo, k1, sk2p, k1, yo, k1; repeat from * until there are 3 sts left. Yo, k1, skp.
Rounds 2, 3, 4, 6 and 7: k all sts.
Round 5: k1, yo, k1, sk2p, *k1, yo, k1, yo, k1, sk2p; repeat from * until there are 2 sts left. K1, yo, k1.
Round 8: k all sts.
Repeat rounds 1 to 8 to for the Rosebud trellis st.

Schematics
Schematic Measurements
Let’s knit!
Begin Skirt
With longer needles, cast on 331 (379, 427, 475, 523) (571, 613, 661, 709) sts o, place BOR marker. Join to knit in the round.
Note: Slip the marker every time you are going to start a new round. Work 4 rounds in Garter st, beginning with a knit round.
Begin Rosebud Trellis st
Note: You can work from the written instructions or the chart above.
Round 1: work round 1 of the Rosebud Trellis st.
Round 2: work the next round of the Rosebud Trellis st.
Round 3-8: Same as Round 2.
Repeat Rounds 1-8 until the piece measures 5 ½ (5 ½, 6, 6, 6 ½) (6 ½, 7, 7, 7)" / 14 (14, 15, 15, 16.5) (16.5, 18, 18, 18) cm from the beginning of the Rosebud Trellis st (about 62 (62, 68, 68, 74) (74, 80, 80, 80) rounds without including the Garter st rounds, if your gauge matched the round gauge exactly).
Begin St st
Round 63 (63, 69, 69, 75) (75, 81, 81, 81): k all sts.
Knit until the piece measures 17 (17 ½, 18, 18 ½, 19 ½) (19 ¾, 20 ¼, 20 ½, 21 ¼)” /43 (44.5, 45.5, 47, 49.5, 50, 51.5, 52, 54) cm from the cast on edge (about 180 (186, 192, 198, 208) (212, 218, 220, 228) rounds after the Garter st rounds, if your gauge matched the round gauge exactly).
Bodice
Waist shaping
Round 1 (decrease round): (k1, ssk) 27 (31, 34, 39, 43) (46, 51, 54, 58) times, ssk 0 (0, 2, 0, 0) (2, 0, 0, 0) times, k3 (0, 1, 3, 0) (1, 1, 7, 4), k2tog 0 (0, 2, 0, 0) (2, 0, 0, 0) times, (k2tog, k1) 27 (32, 34, 39, 44) (46, 51, 54, 59) times. (k1, ssk) 27 (31, 34, 39, 43) (46, 51, 54, 58) times, ssk 0 (0, 2, 0, 0) (2, 0, 0, 0) times, k4 (1, 2, 4, 1) (2, 0, 6, 3), k2tog 0 (0, 2, 0, 0) (2, 0, 0, 0) times, (k2tog, k1) 27 (32, 34, 39, 44) (46, 51, 54, 59) times. 108 (126, 144, 156, 174) (192, 204, 216, 234) sts decreased. — 223 (253, 283, 319, 349) (379, 409, 445, 475) sts left.
Round 2: k all sts.
Work 1 (1, 1, 1, 1 ½) (1 ½, 1 ½, 1 ½, 1 ½)” /2.5 (2.5, 2.5, 2.5, 4) (4, 4, 4, 4) cm in the Rosebud Trellis st, beginning with round 1 (about 12 (12, 12, 12, 18) (18, 18, 18, 18) rounds in total of the Rosebud Trellis st).
Next round: k all the sts.
Knit until the piece measures 6 ½ (6 ½, 6 ¾, 6 ¾, 6 ½) (6 ½, 6 ½, 6 ¼, 6)” /16.5 (16.5, 17, 17, 16.5) (16.5, 16.5, 16, 15) cm from the Decrease round (about 72 (74, 74, 74, 72) (72, 72, 70, 66) rounds total).
Front and back division
Note: Now we are going to divide the front and the back sts. They each will be worked back and forth, separately, from now on.
Row 1 (RS row): k111 (127, 141, 159, 175) (189, 205, 223, 237), pm, turn your work. You can leave the remaining 112 (126, 142, 160, 174) (190, 204, 222, 238) sts on a spare needle or stitch holder, in which case you don’t need the marker. You can also leave them on your working circular needle, and place the marker as indicated above.
Row 2: p105 (121, 133, 151, 167) (179, 195, 211, 225), turn your work. Place the remaining 6 (6, 8, 8, 8) (10, 10, 12, 12) sts on a st holder.
Left Front Shoulder
Note: Now we are going to divide the left and right front shoulder sts to shape the neckline. The neckline edge on both shoulders will be worked with a slipped st for a cleaner edge.

Row 3 (RS row): k49 (57, 62, 71, 79) (84, 92, 99, 106), turn work. — 49 (57, 62, 71, 79) (84, 92, 99, 106) sts on the Left Front Shoulder. You can leave the remaining 56 (64, 71, 80, 88) (95, 103, 112, 119) sts from the Right Front Shoulder on a spare needle or stitch holder, or you can leave them on your working circular needle.
Row 4 and the remaining WS rows: sl1 wyib, p to end.
Row 5 (Decrease row): k to last 3 sts, k2tog, k1. 1 st decreased. — 48 (56, 61, 70, 78) (83, 91, 98, 105) sts.
Continue working Rows 4 and 5 (Decrease row) until you have 23 (31, 30, 36, 42) (46, 52, 56, 63) sts left on the Left Front Shoulder, ending with a WS row.
Sizes 1 (2, 3, 4, 5) (6, 7, 8, -)
Work even (with the slipped stitch on WS rows) until the piece measures 6 (6 ¼, 6 ½, 7, 7 ½) (7 ½, 8, 8 ½, -)” /15 (16, 17, 18, 18.5) (19.5, 20.5, 21.5, -) cm from the beginning of the neckline (about 8 (12, 4, 2, 2) (2, 2, 0, -) rows more).
Bind off all sts.
Size - (-, -, -, -) (-, -, -, 9)
Next Row (decrease row, RS row): k to last 4 sts, k3tog, k1. 2 sts decreased. — - (-, -, -, -) (-, -, -, 61) sts.
Next Row: sl1 wyib, p to end.
Repeat the last 2 rows once more. — 59 sts.
Bind off all sts.
Right Front Shoulder
With the RS of the front facing you:
Row 3 (RS row): join yarn, bind off 1 st and k until there are 6 (6, 8, 8, 8) (10, 10, 12, 12) sts from the Right Front Shoulder (until the marker if the Back sts are still on the needle, or total if you left them on a spare needle), turn work. Place the remaining 6 (6, 8, 8, 8) (10, 10, 12, 12) sts on a st holder. —49 (57, 62, 71, 79) (84, 92, 99, 106) sts on the Right Front Shoulder. You can take away the st marker you placed on row 1.
Row 4 and the remaining WS rows: p all sts.
Row 5 (Decrease row): sl1 kwise wyib, ssk, k to end. 1 st decreased. — 48 (56, 61, 70, 78) (83, 91, 98, 105) sts.
sts.
Continue working Rows 4 and 5 (Decrease row) until you have 23 (31, 30, 36, 42) (46, 52, 56, 63) sts left on the Right Front Shoulder, ending with a WS row.
Sizes 1 (2, 3, 4, 5) (6, 7, 8, -)
Work even (with the slipped stitch on RS rows) until the piece measures 6 (6 ¼, 6 ½, 7, 7 ½) (7 ½, 8, 8 ½, -)” /15 (16, 17, 18, 18.5) (19.5, 20.5, 21.5, -) cm from the beginning of the neckline (about 8 (12, 4, 2, 2) (2, 2, 0, -) rows more, and 64 (68, 72, 76, 80) (82, 86, 90, -) rows total).
Bind off all sts.
Size - (-, -, -, -) (-, -, -, 9)
Next row (decrease row, RS row): sl1 kwise wyib, sssk, k to end. 2 sts decreased. — - (-, -, -, -) (-, -, -, 61) sts.
Next row: sl1 wyib, p to end.
Repeat last 2 rows once more. — 59 sts.
Work even (with the slipped stitch on RS rows) until the piece measures - (-, -, -, -) (-, -, -, 8 ¾)” /- (-, -, -, -) (-, -, -, 22) cm from the beginning of the neckline (- (-, -, -, -) (-, -, -, 94) rows total).
Bind off all sts.
Back
With the RS of the front facing you:
Row 1 (RS row): join yarn, k to end. —112 (126, 142, 160, 174) (190, 204, 222, 238) sts on the Back.
Row 2: p to last 6 (6, 8, 8, 8) (10, 10, 12, 12) sts, turn your work. Place the remaining 6 (6, 8, 8, 8) (10, 10, 12, 12) sts on a st holder. — 106 (120, 134, 152, 166) (180, 194, 210, 226) sts.
Row 3: k to last 6 (6, 8, 8, 8) (10, 10, 12, 12) sts, turn your work. Place the remaining 6 (6, 8, 8, 8) (10, 10, 12, 12) sts on a st holder. — 100 (114, 126, 144, 158) (170, 184, 198, 214) sts.
Row 4 and the remaining WS rows: p all sts.
Row 5 and the remaining RS rows: k all sts.
Work even in St st 6 (6 ¼, 6 ½, 7, 7 ½) (7 ½, 8, 8 ½, 8 ¾)”/15 (16, 17, 18, 18.5) (19.5, 20.5, 21.5, 22) cm from beginning of the armhole (about 64 (68, 72, 76, 80) (82, 86, 90, 94) rows total, ending with a WS row. Bind off all sts.
Sleeves
With the RS facing you, join the bind off edges of the Left Front Shoulder and the Right Front Shoulder to the bind off edge of Back with a horizontal seam.
Right Sleeve
With the shorter circular needles and the RS facing you pick up and knit the 6 (6, 8, 8, 8) (10, 10, 12, 12) sts you had left on hold from the Back, then pick up and knit 49 (52, 53, 56, 59) (60, 63, 67, 70) sts along the Back right edge, 48 (51, 52, 55, 58) (59, 62, 66, 69) sts along the right front shoulder edge, and then pick up and knit the 6 (6, 8, 8, 8) (10, 10, 12, 12) sts you had left on hold from the right front shoulder. Place a new BOR marker and join to knit in the round. — 109 (115, 121, 127,133) (139, 145, 157, 163) sts.
Round 1: work round 1 of the Rosebud Trellis st
Round 2: work the next round of the Rosebud Trellis st.
Round 3-8: Same as Round 2.
Repeat rounds 1 to 8 until the piece measures 4 (4, 4, 4, 4) (4.5, 4.5, 4.5, 4.5)” /10 (10, 10, 10, 10) (11.5, 11.5, 11.5, 11.5) cm from the beginning of the sleeve (about 44 (44, 44, 44, 44) (48, 48, 48, 48) rounds total).
Work in Garter st 4 rounds more. Bind off all sts.
Left Sleeve
With the shorter circular needles and the RS facing you pick up and knit the 6 (6, 8, 8, 8) (10, 10, 12, 12) sts you had left on hold from the Left Front Shoulder, then pick up and knit 48 (51, 52, 55, 58) (59, 62, 66, 69) sts along the Left Front Shoulder edge, 49 (52, 53, 56, 59) (60, 63, 67, 70) sts along the Back left edge, and then pick up and knit the 6 (6, 8, 8, 8) (10, 10, 12, 12) sts you had left on hold from the Back. Place a new BOR marker and join to knit in the round. — 109 (115, 121, 127,133) (139, 145, 157, 163) sts.
Round 1: work round 1 of the Rosebud Trellis st
Round 2: work the next round of the Rosebud Trellis st.
Round 3-8: Same as Round 2.
Repeat rounds 1 to 8 until the piece measures 4 (4, 4, 4, 4) (4.5, 4.5, 4.5, 4.5) in/10 (10, 10, 10, 10) (11.5, 11.5, 11.5, 11.5) cm from the beginning of the sleeve (about 44 (44, 44, 44, 44) (48, 48, 48, 48) rounds total).
Work in Garter st 4 rounds more. Bind off all sts.
Finishing
Block the dress to measurements, weave in ends. Now your dress is ready for you to rock it!
You can share your handknits with the KBD community tagging me and using the hashtags #SonadoraDress and #katebarriosdesigns

Credits
Tech Editor : Luke Gilligan (@woolenthusiast_techediting)
Copyrights
Copyright Kate Barrios Designs, 2021. You are welcome to sell finished items of this pattern, but please give credit to my design linking my website and social media.
You are not allowed to alter this pattern and sell a similar one.
Version 1, February 2021.


