
The Hojarasca Top Vol. 2
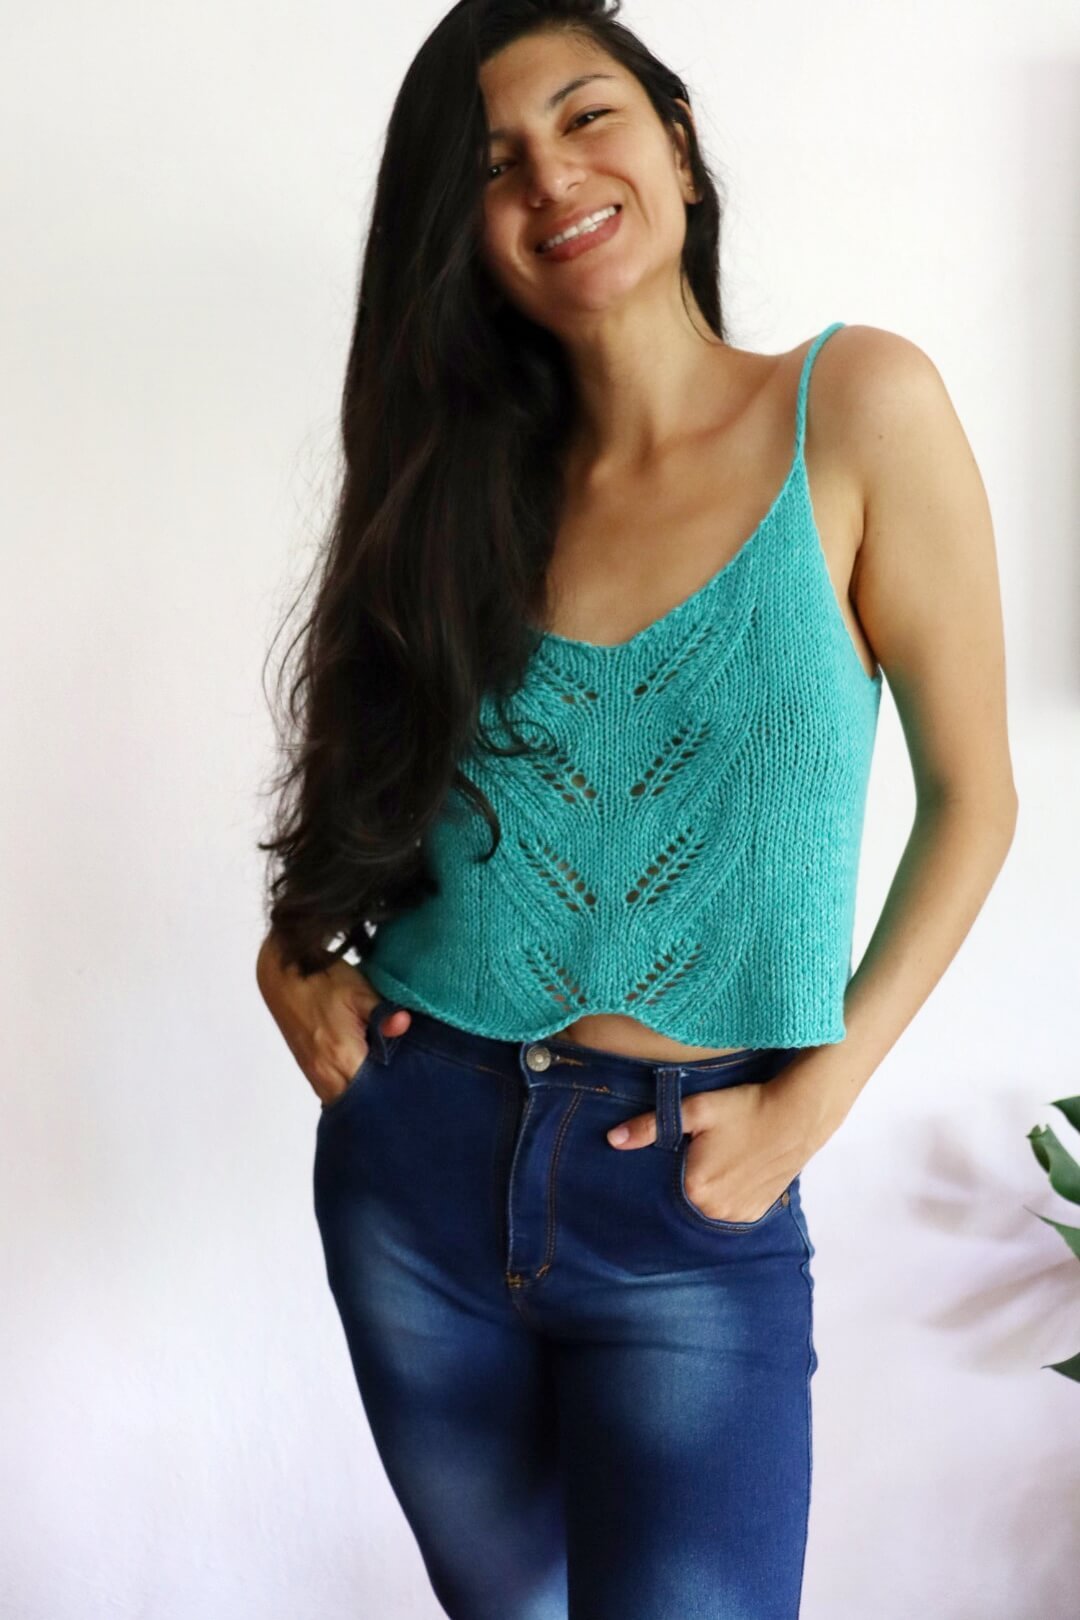
An intermediate-friendly knitted crop top– my Hojarasca Top Vol. 2– is a free pattern here on the blog! Read through my inspiration, materials and stitch pattern used. Or scroll on down for the free pattern.
Introduction + Design
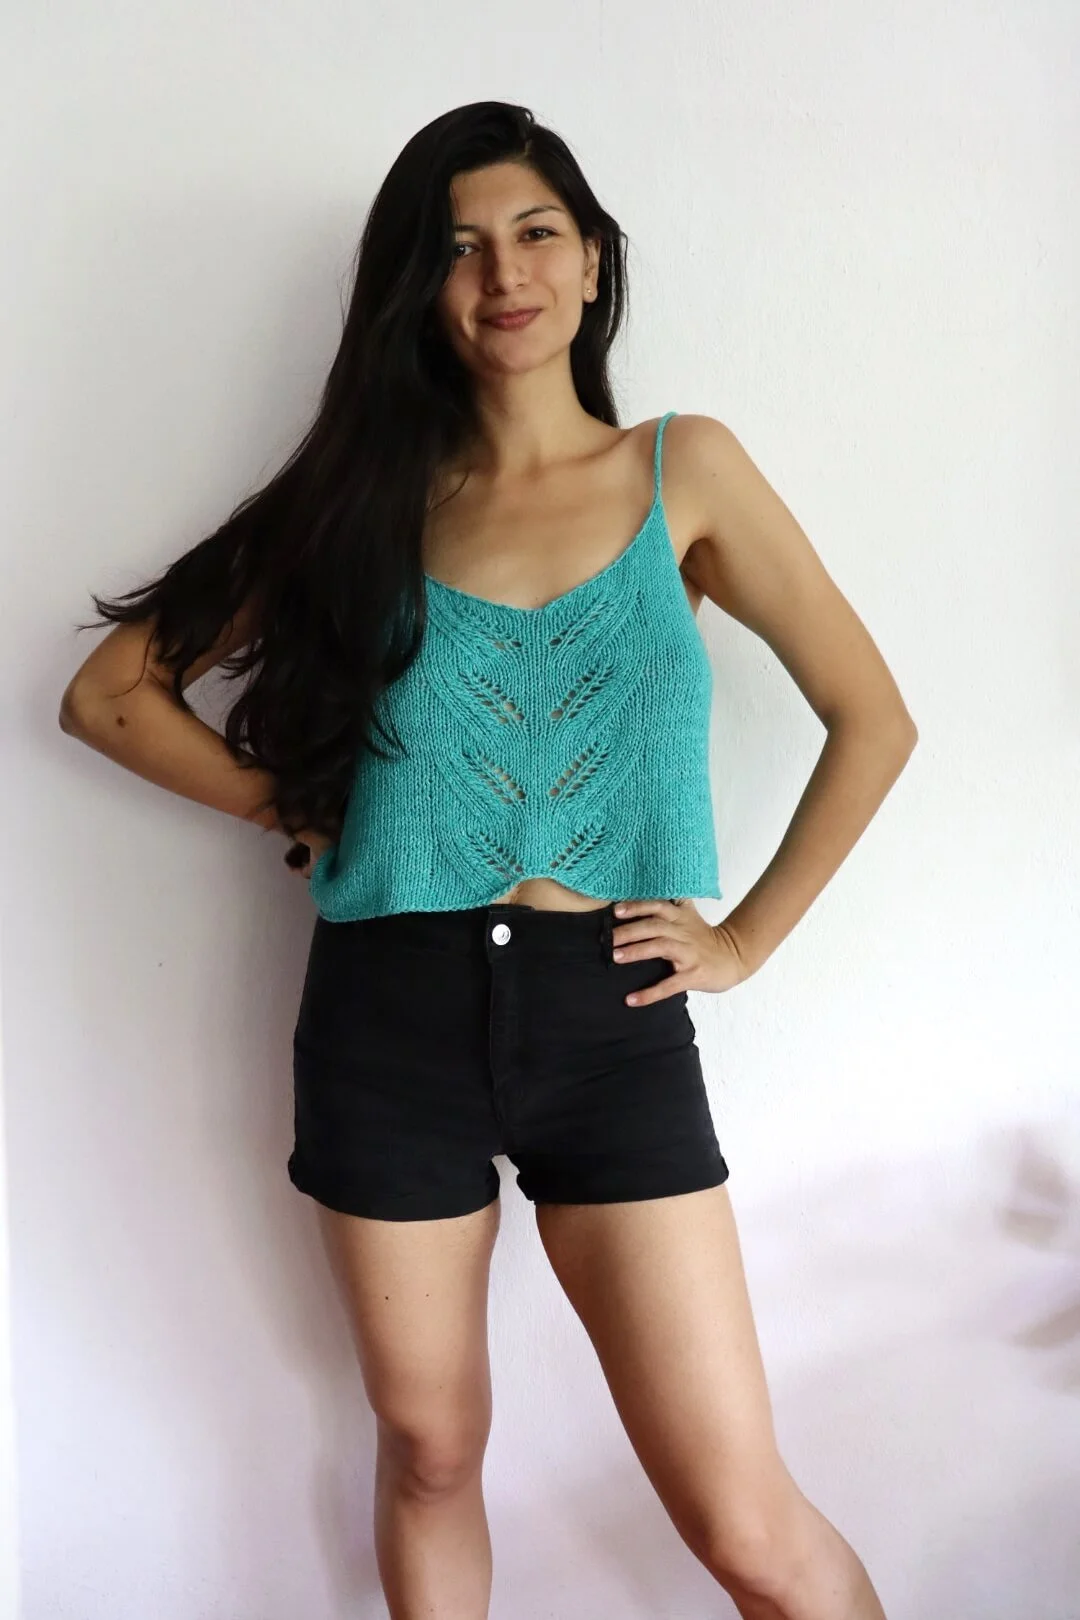
The Hojarasca Top Vol.2 is inspired by the beautiful greenery of Summer. How fresh it makes everything, how we can find shade to hide from the sun for a little while. It’s a very fresh crop top that combines with almost all of your wardrobe! Wear it with high-waisted anything, shorts, skinny jeans, long flowy skirts. When it begins to cool off, wear it on top of a t-shirt for a bohemian look!
The Hojarasca Top Vol.2 is worked bottom up in the round, beginning at the left side. Once the armhole is reached, the Left Front is worked to the I-cord stitches to work the straps. Then the Right Front is worked in the same way. Finally, we come back to the Back stitches to bind them off. Then the straps are sewn to the back.

The quickest knit of the Summer!
I assure you, this top will be flying off your needles! It's worked with US 8 (5mm) needles and in the round, so there are no seams to sew, and you only need to attach the straps with two quick stitches, that's it!
Mindless knitting, here I go!
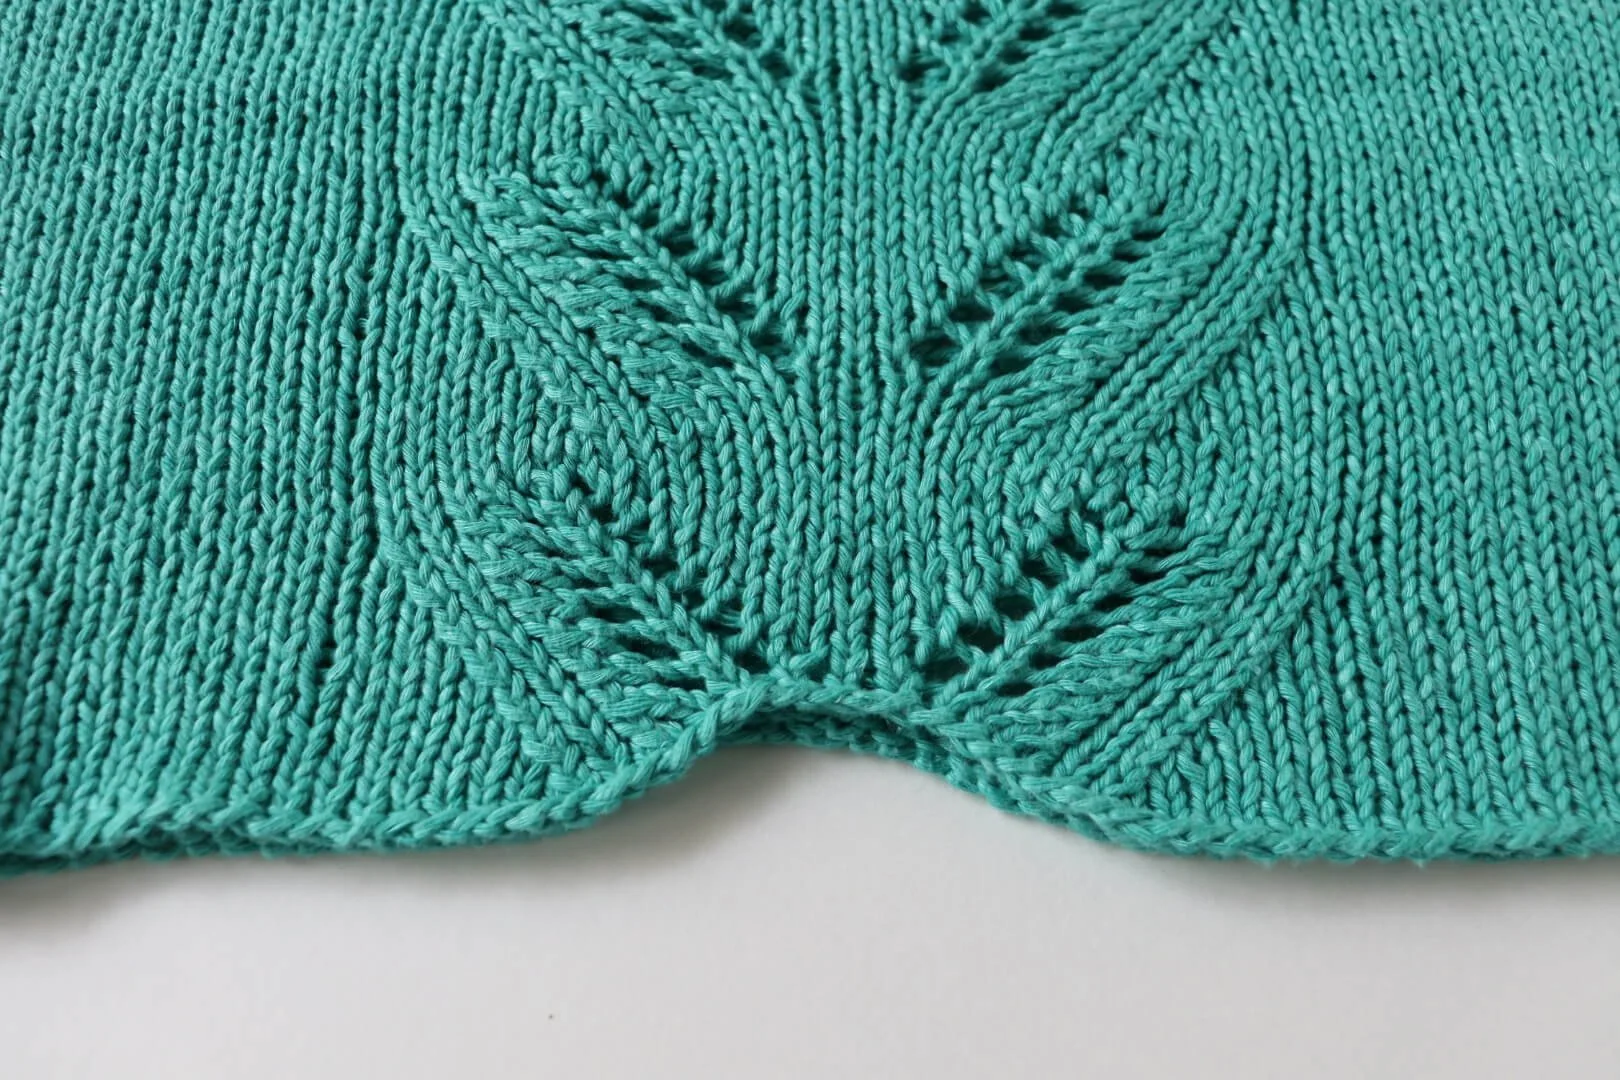
The Hojarasca top features an easy lace motif on the center front and back, which you will mark with stitch markers. That means, you'll be mainly working knit stitches all over the piece (except for the left and right fronts after the armhole, where you work Stockinette stitch flat).
An easy intro to knitting in the round
If you've been wanting to try knitting in the round, this is the right project to do it! It's quick and easy, and all written instructions easy to follow!
All sizes!
This pattern is graded to fit chest sizes from 30 to 62 in, and it has only a slightly oversize fit. It’s very confy and fresh, ideal for Summer fun!


Free Pattern
The pattern is available for free in this blog post. This blog has ads so I can provide the pattern for free.
Ad-free PDF version
Get the ad-free, large print, printable PDF pattern, which includes a stitch and row count table HERE on Ravelry, or HERE on Etsy.
Buying the PDF version makes it easy to follow the pattern without ads and is ideal if you want to print the pattern. As a bonus, when you buy the pattern it supports my work and enables me to continue making patterns for you!
PIN this pattern to your Pinterest boards for later HERE.
Techniques Required
Knit & purl, cast-on and bind-off
Yarn over
Decreasing stitches
Working from written instructions
Working an I-cord
Working in the round
Blocking
For this sweater you will need:
Rosários 4 Boolero (3.5 oz/100 g; 164 yd/150 m; 50% cotton/50% bamboo).
Or
Medium Weight yarn (3) of approximately 3.5 oz/100 g; 164 yd/150 m; 50% cotton/50% bamboo, but as long as the content is predominantly cotton you should be good like with this, this, or this yarn.
Yardage
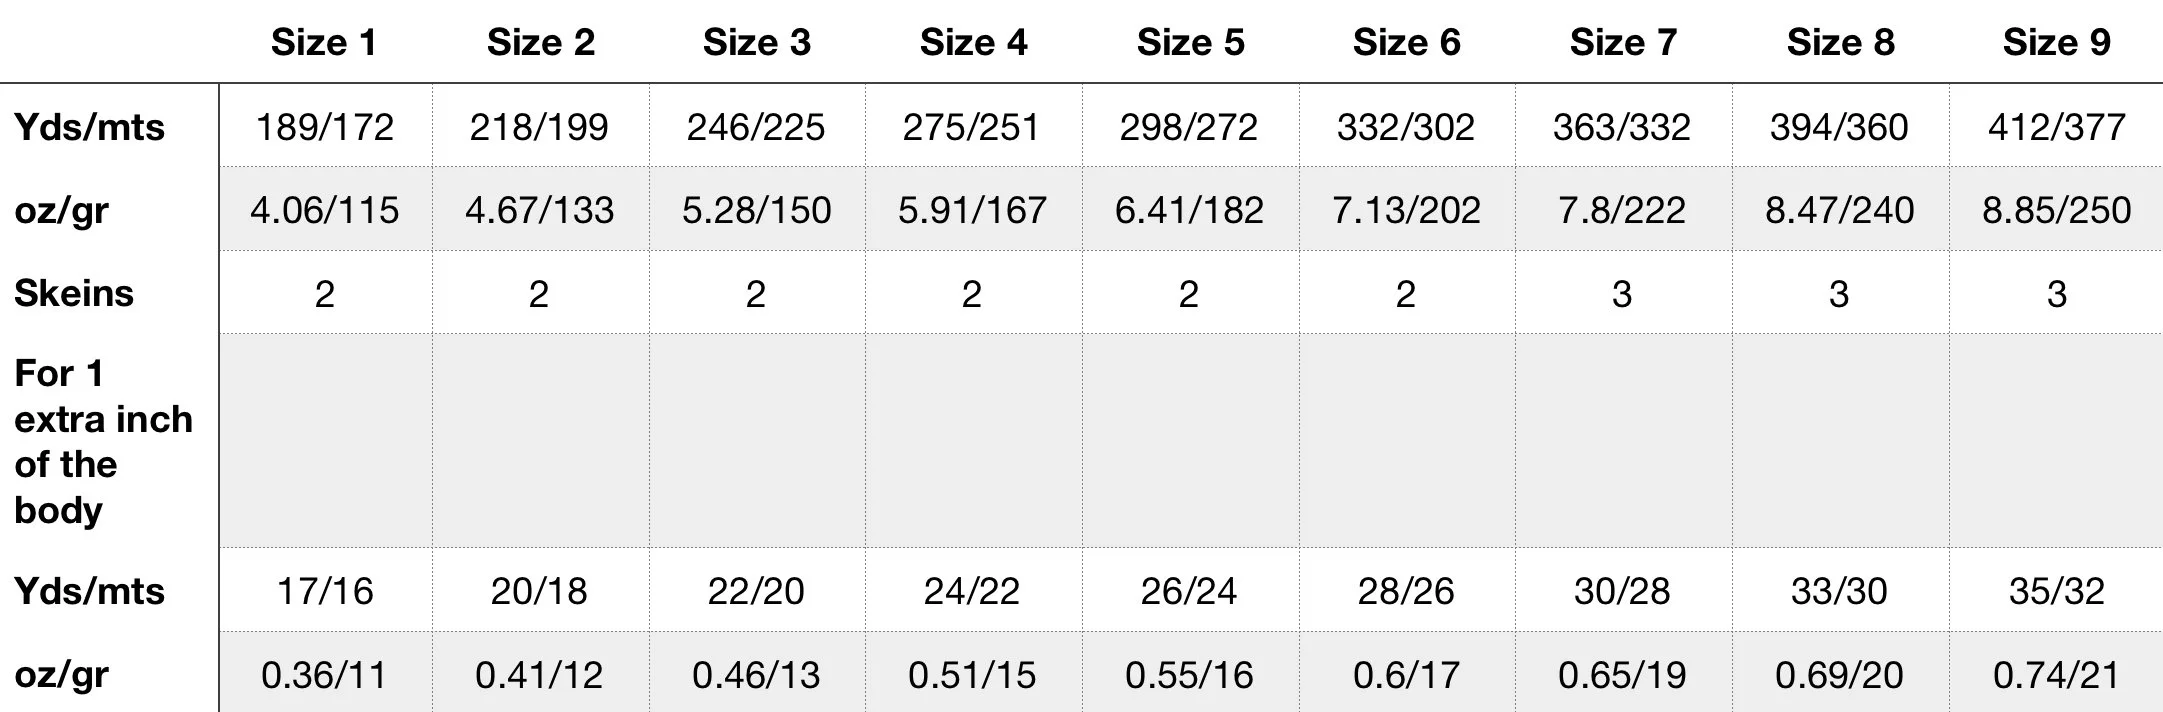
The yardage is an approximation plus 10% (for security) for all sizes. Additionally, you can see how many skeins of the recommended yarn are needed, and how much extra yarn you need if you want to add 1 inch to the length of the body.
Materials
Needles
US size 8/5 mm circular needles (24 in/60 cm long for Size 1, 32 in/80 cm long for Sizes 2 onwards) or size to obtain correct gauge.
Notions
● Tapestry needle.
● 5 Stitch markers or scrap yarn.
Gauge
16.5 sts and 22 rounds = 4in/10 cm in Stockinette st in the round with size US 8/5 mm needles after blocking, or size to obtain the gauge.
Take time to save time! Knit the gauge sample.
Sizes
1(2, 3, 4, 5)(6, 7, 8, 9)
To fit with + 1-3 in/2.5-7.5 cm of ease at the bust.
Note: Sample was knit in Size 3, to fit the model with a 36 ½ in/93 cm bust.
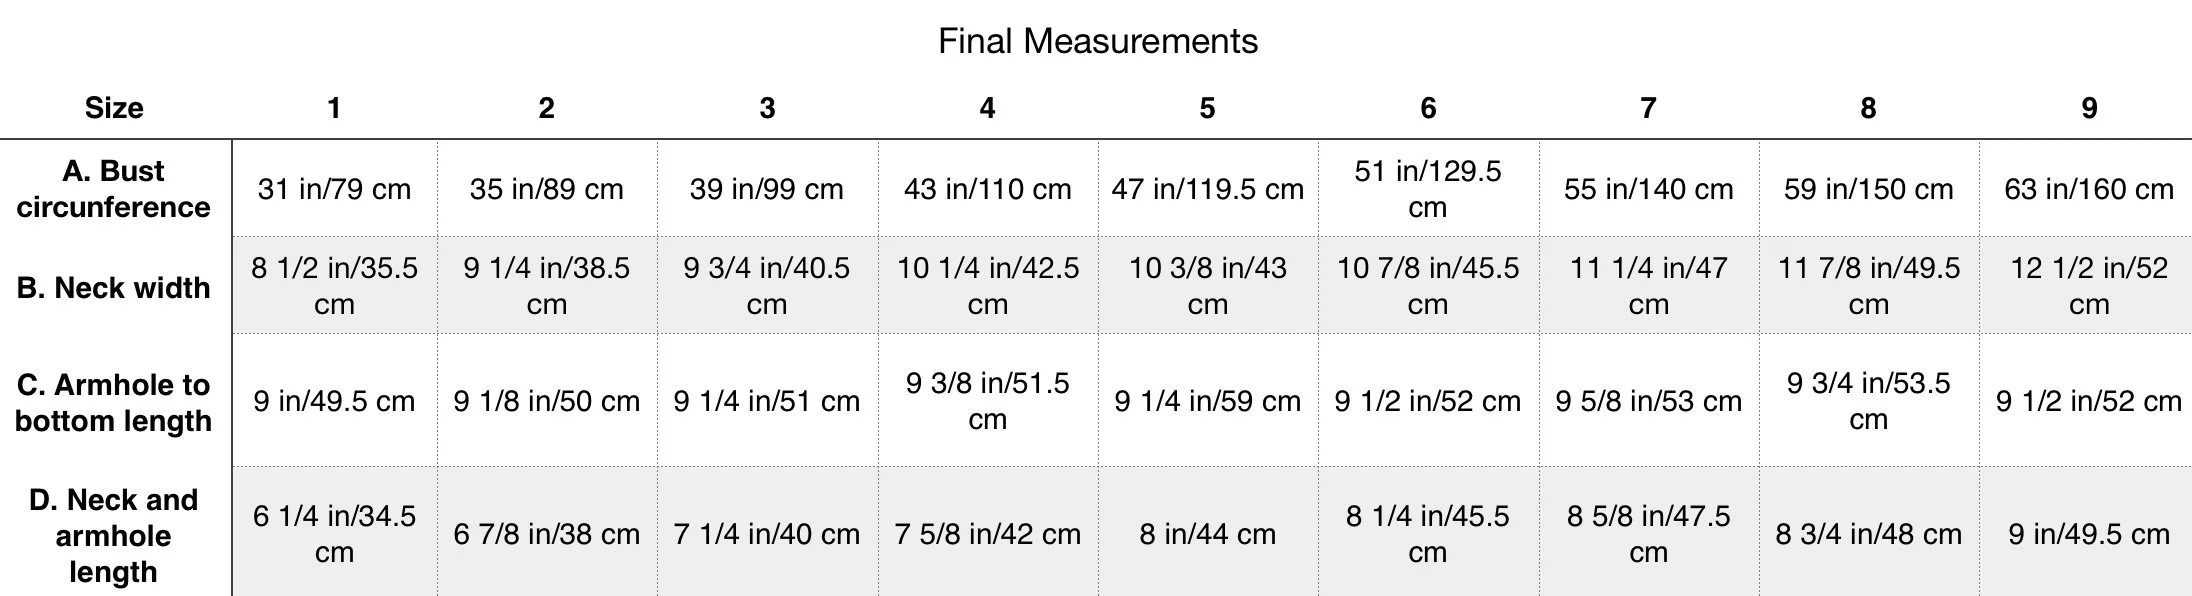
Finished Measurements
Bust at underarm: 31 (35, 39, 43, 47)(51, 55, 59, 63) in/79 (89, 99, 110, 119.5)(129.5, 140, 150, 160) cm
Finished Length: 15 ¼ (16, 16 ½, 17, 17 ¼)(17 ¾, 18 ¼, 18 ½, 18 ½) in/84 (88, 91, 93.5, 95)(97.5, 100.5, 102, 102) cm.
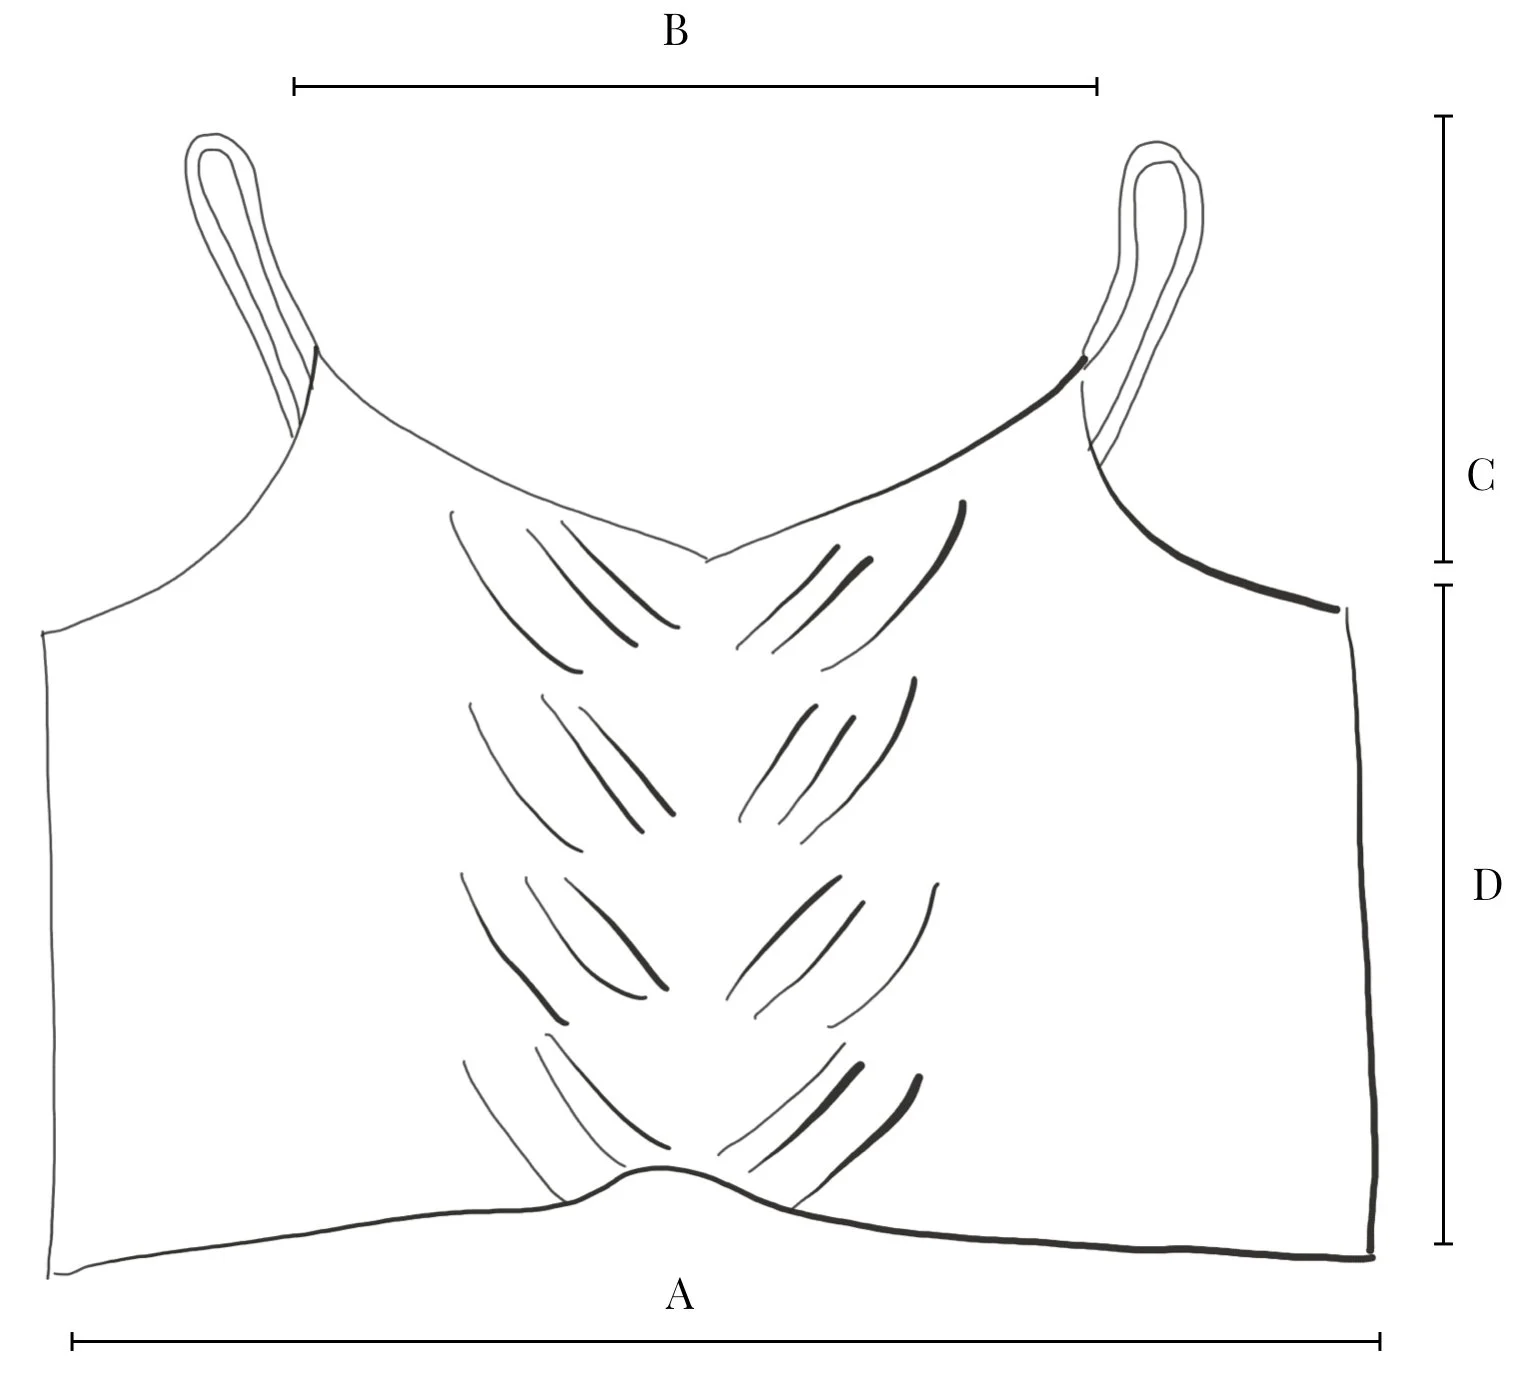
Schematics
Abreviations
BOR: beginning of the round
k: knit
k2tog: knit 2 together
p: purl
patt: pattern
pm: place marker
RS: right side of the work
sl: slip
sm: slip marker
ssk: slip, slip, knit
st(s): stitch(es)
WS: wrong side of the work
yo: yarn over
Techniques
Knit 2 together: insert the needle through the front loops of the first 2 sts on the LN needle and k them together as if they were 1 st.
Slip st: slip st to the right-hand needle pwise, unless instructed otherwise.
Slip, slip, knit: sl next 2 sts to the RN, one by one, kwise. Slide the left-hand needle into the front loops of the slipped sts and knit them together.
Sloped bind-off: this bind off forms a smooth curve and prevents “stair steps” to form on the following bind-off rows. To do it, work the first bind-off row as usual to define the initial part of the bind-off. Work the next row to the last st, but do not work it. Instead, turn the work so that the unworked st becomes the first st on the right-hand needle. Keeping the yarn in the back of the work, slip the first st on the left-hand needle pwise, then bind off the unworked st by lifting it over the slipped st and off the needle, as for a regular bind-off. This is your first bind-off st. Keep working in this way until you have completed all bind-off rows.
Yarn over: bring the working yarn over your needle from front to back.
Stitch Patterns
Double Leaf st
(multiple of 29 sts).
Row 1: k29.
Row 2 and all even rounds: k all sts.
Row 3: k6, k2tog, k1, k2tog, k1, (yo, k1) two times, k1, (k1, yo) two times, k1, ssk, k1, ssk, k6.
Row 5: k5, k2tog, k1, k2tog, k1, yo, k1, yo, k5, yo, k1, yo, k1, ssk, k1, ssk, k5.
Row 7: k4, k2tog, k1, k2tog, k1, yo, k1, yo, k7, yo, k1, yo, k1, ssk, k1, ssk, k4.
Row 9: k3, k2tog, k1, k2tog, k1, yo, k1, yo, k9, yo, k1, yo, k1, ssk, k1, ssk, k3.
Row 11: k2, k2tog, k1, k2tog, k1, yo, k1, yo, k11, yo, k1, yo, k1, ssk, k1, ssk, k2.
Row 13: k1, k2tog, k1, k2tog, k1, yo, k1, yo, k13, yo, k1, yo, k1, ssk, k1, ssk, k1.
Row 15: k2tog, k1, k2tog, k1, yo, k1, yo, k15, yo, k1, yo, k1, ssk, k1, ssk.
Row 16: p all sts.
Repeat rows 1 - 16 for Double Leaf st.
Notes
I am a loose knitter. If you are a tight knitter, I advise you to try knitting a gauge swatch with one needle size bigger than stated in pattern.
The pattern is written for 9 sizes: 1(2, 3, 4, 5)(6, 7, 8, 9). When the instructions are written for just one size, there will only be one number of sts or rounds.
For best results, read the entire pattern before you start to knit. Send your questions/comments to [email protected]
Let’s knit!
Cast on 130 (146, 162, 178, 194)(210, 230, 246, 262). Taking care not to twist the sts, place a BOR marker, and join the round.
Set-up round: k18 (22, 26, 30, 34)(38, 43, 47, 51), pm, work Round 1 of the Double Leaf st patt, pm, k36 (44, 52, 60, 68)(76, 86, 94, 102), pm, work Round 1 of the Double Leaf st patt, pm, k to end of round.
Round 2 and the remaining even rounds: (k to the next marker, sm) four times, k to end of round.
Round 3: (k to the next marker, sm, work Round 3 of the Double Leaf st patt, sm) two times, k to end of round.
Continue working as established following Rounds 1-16 of the Double Leaf st, until you have 1 st left to complete Round 50 (50, 50, 52, 50)(52, 52, 54, 52).
Neckline and Armhole Shaping
We are going to shape the Neckline and the Armhole AT THE SAME time, working first the Left Front (and leaving the Right Front and Back sts on hold), and then the Right Front (leaving the Back sts on hold). Both the Armhole Shaping instructions and the Neckline Shaping instructions are worked using the Slopped Bind-off Method, which you can find on the Techniques section of the pattern. Once you finish working the Armhole Shaping, you will sl 1 st at the beginning of each row for a clean edge.
Left Front
Row 1 (RS row): FC with the st from the previous round you didn’t work and 1 st of the new row, and bind off 4 sts (including the one you just crossed). k to next marker, work 15 sts in pattern. Turn your work. — 29 (33, 37, 41, 45)(49, 54, 58, 62) sts for the Left Front.
Note: You can leave the remaining 97 (109, 121, 133, 145)(157, 172, 184, 196) sts from the Right Front and the Back on the same circular needle and simply not working them, or you can place them on a st holder. I recommend to leave them on the cable of the circular needle you’ve been using.
Row 2 (WS row): bind off 1 st, p to 1 st to the end of row. Turn your work. — 28 (32, 36, 40, 44)(48, 53, 57, 61) sts.
Follow the next instructions to work the Armhole Shaping (on the RS rows) and Neckline Shaping (on the WS rows), keeping in mind to work in Stockinette st to the marker (k on the RS rows, p on the WS rows), and the Double Leaf st patt until it’s doable. Remember to work the bind offs with the Slopped Bind-off method.
Bind off 3 sts at the beginning of the next one (one, two, three, four)(five, five, six, six) RS row; 2 sts at the beginning of the next two (three, two, two, three)(three, four, five, six) RS rows, and 1 st at the beginning of the next one (one, three, three, two)(two, four, two, two) RS row. The Armhole Shaping will be finished on Row 10 (12, 16, 18, 20)(22, 28, 28, 30), for a total of 12 (14, 17, 20, 24)(27, 31, 34, 36) sts decreased (including the initial 4 sts on Row 1).
AT THE SAME TIME,
Bind off 1 (1, 0, 1, 1)(0, 1, 0, 0) st at the beginning of the next WS row, and 2 sts at the beginning of the next eight (nine, ten, ten, ten)(eleven, eleven, twelve, thirteen) WS rows. The Neckline Shaping will be finished on Row 20 (22, 22, 22, 22)(24, 24, 26, 28), for a total of 18 (20, 21, 22, 22)(23, 24, 25, 27) sts decreased (including the initial st on Row 2).
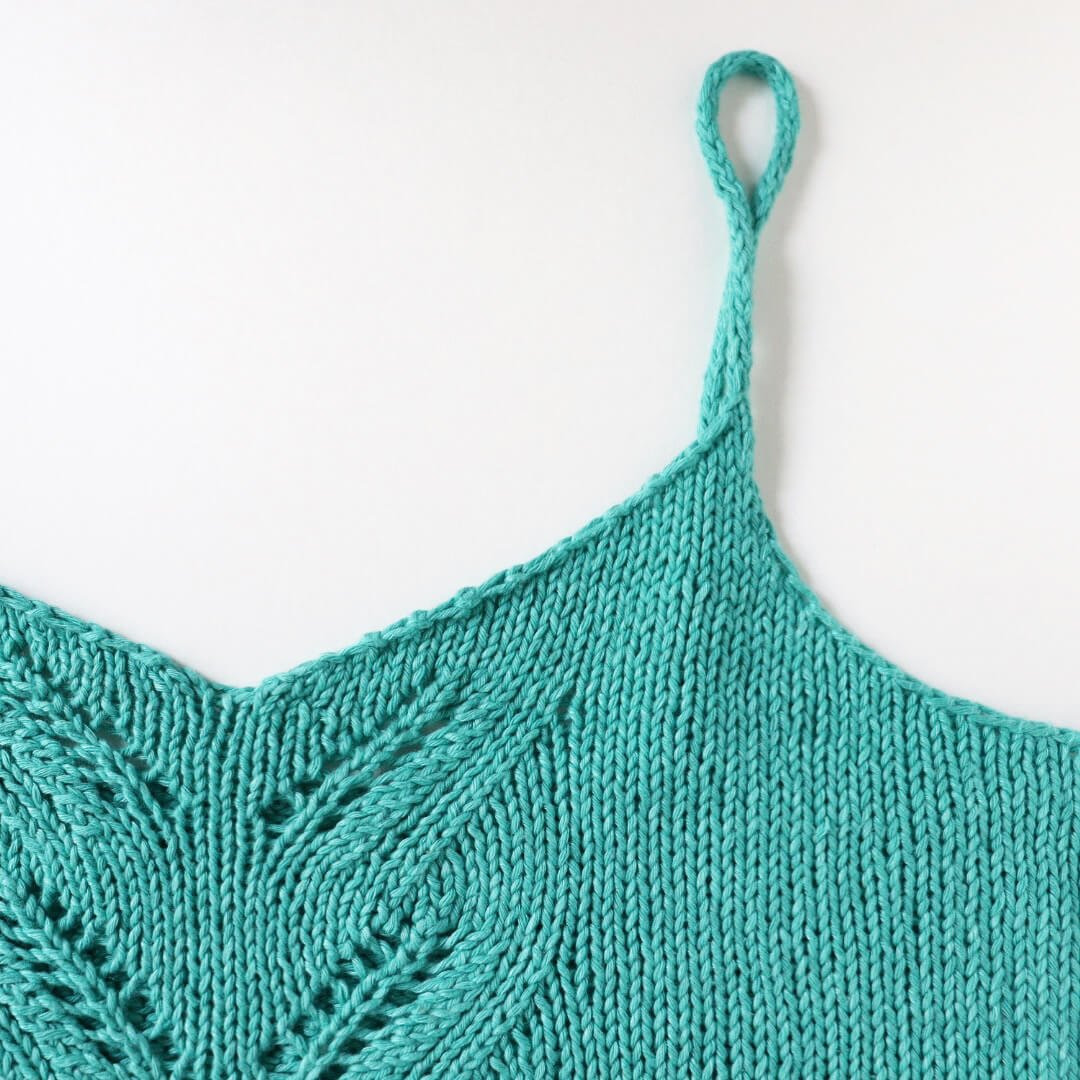
You will have 3 sts left to work the Left Strap.
Left Strap
Work an I-cord with the 3 sts you have left on the right-hand needle, as follows: with the RS of the work facing you, sl one by one the sts on the right-hand needle to the left-hand needle purlwise, so that the working yarn is no longer at the tip of the needles, but on the back. k3. Continue slipping the 3 sts to the left-hand needle and them knitting them until the strap measures 9 ⅜ (10 ¼, 10 ⅞, 11 ⅜, 12)(12 ⅜, 13, 13 ⅛, 13 ½) in/24 (26, 27.5, 29, 30.5)(31.5, 33, 33.5, 34.5) cm from the beginning of the strap slightly stretched. Bind off all the sts, leaving a tail long enough to attach the strap to the Back, and weave it in.
Right Front
With the RS facing you, pick the sts left on hold and join yarn.
Row 1 (RS row): work in pattern (you begin at st number 16 of the Double Leaf st patt) to the marker, sm, k17 (21, 25, 29, 33)(37, 42, 46, 50), FC. sl the last st you worked to the left-hand needle. Turn your work. —32 (36, 40, 44, 48)(52, 57, 61, 65) sts for the Right Front.
Note: Leave the 65 (73, 81, 89, 97)(105, 115, 123, 131) sts for the Back on hold.
Row 2 (WS row): bind off 4 sts. p to 1 st to the end of row. Turn your work. — 28 (32, 36, 40, 44)(48, 53, 57, 61) sts.
Follow the next instructions to work the Neckline Shaping (on the RS rows) and Armhole Shaping (on the WS rows), keeping in mind to work in Stockinette st to the marker (k on the RS rows, p on the WS rows), and the Double Leaf st patt until it’s doable. Remember to work the bind offs with the Slopped Bind-off method.
Bind off 1 (1, 0, 1, 1)(0, 1, 0, 0) st at the beginning of the next RS row, and 2 sts at the beginning of the next eight (nine, ten, ten, ten)(eleven, eleven, twelve, thirteen) RS rows. The Neckline Shaping will be finished on Row 20 (22, 22, 22, 22)(24, 24, 26, 28), for a total of 17 (19, 20, 21, 21)(22, 23, 24, 26) sts decreased.
AT THE SAME TIME,
Bind off 3 sts at the beginning of the next one (one, two, three, four)(five, five, six, six) WS row; 2 sts at the beginning of the next two (three, two, two, three)(three, four, five, six) WS rows, and 1 st at the beginning of the next one (one, three, three, two)(two, four, two, two) WS row. The Armhole Shaping will be finished on Row 10 (12, 16, 18, 20)(22, 28, 28, 30), for a total of 12 (14, 17, 20, 24)(27, 31, 34, 36) sts decreased (including the initial 4 sts on Row 2).
You will have 3 sts left to work the Left Strap.
Right Strap
Follow the instructions for the Left Strap.
Back
With the RS facing you, pick the 65 (73, 81, 89, 97)(105, 115, 123, 131) sts left on hold, join yarn, and bind them off in pattern.
FINISHING
With the WS of the Back facing you, count 15 (17, 20, 23, 27)(30, 34, 37, 39) sts from each of the FC on the sides (the middle of each armhole) and place a pin or a st marker on those sts on the Bound-off edge. Thread the yarn tail of one of the straps an sew it to the corresponding side. Repeat with the second strap.
Weave in all the ends, and block the Top to measurements. And now your Hojarasca Top Vol. 2 is ready for you to rock it!
You can share your handknits with the KBD community tagging me and using the hashtags #HojarscaTopVol2 and #katebarriosdesigns
Copyrights
Copyright Kate Barrios Designs, 2022. You are welcome to sell finished items of this pattern, but please give credit to my design linking my website and social media.
You are not allowed to alter this pattern and sell a similar one.
Version 1, August 2022.


